
After completing my R4th Edition 3D board my attention turned, in preparation for the 40th Anniversary of our beloved game, to my favourite edition, the glorious technicolour 2nd edition. With its wonderful full colour Gary Chalk artwork, it is an iconic masterpiece that introduced many to fantasy gaming and the high prices it and its expansions command today show that that popularity has not waned over the last 38 years. I adore it. I only wish it had the first edition artwork on the box cover.
For those who read my R4th edition article on Talisman Island (if not it can be found here) you will know that my inspiration was Fantasy Flight Games forum user Draii’s group. However, for 2nd edition I was on my own in relation to what to do. Obviously without the huge corner expansions of R4th there was a lot less scope to let my imagination run riot in designing and populating huge sprawling corner regions and mini realms.
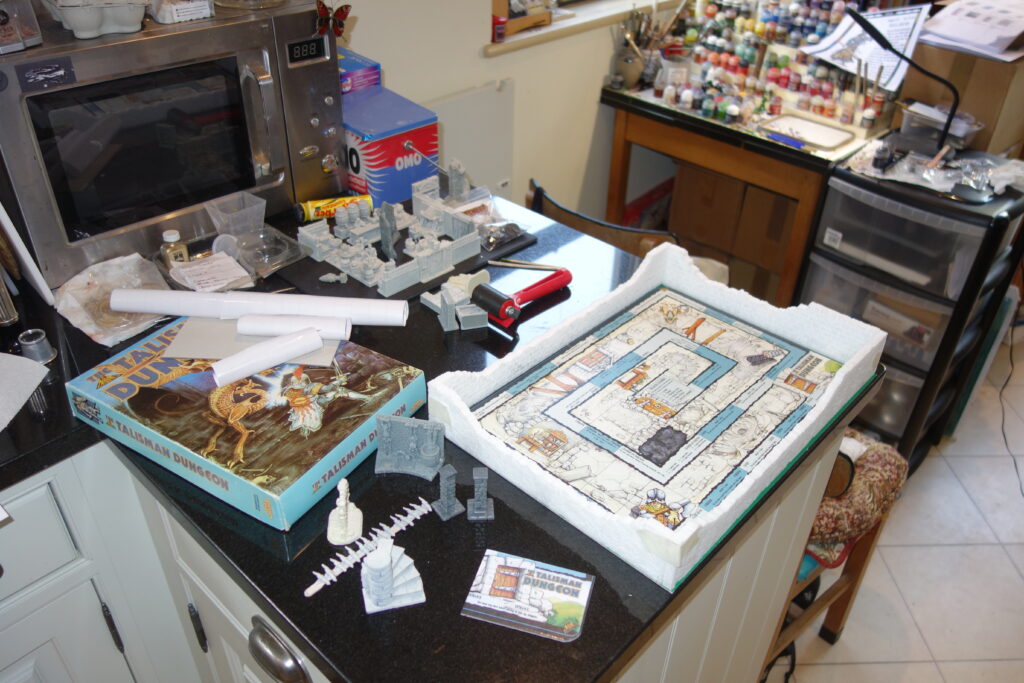
Three of the expansions have no boards at all, and the three that do don’t ‘bolt onto’ the main board like 3rd and R4th edition, and sitting in isolation on a large table look a bit lost.
The 2nd edition City board is rather small and I don’t really like the artwork. (If Gary had done it, what fun we would be having now.) The Dungeon board is also small but much more nicely presented and with Gary back at the helm for Timescape we have some lovely artwork but the board is a bit odd shape wise.
I did not want to cover up any of Gary’s artwork as it gives me a huge nostalgia hit whenever I see it and really enhances the enjoyment of the game so placing lots of scenery on the main board was a big no, no. I would leave the implied narrative of the artwork to tell the story. Also, if you are fortunate to own a fully painted set of 2nd edition miniatures made back in the day by such wonderful figure designers as Aly and Trish Morrison then they complement the artwork perfectly and no further scenery is needed.
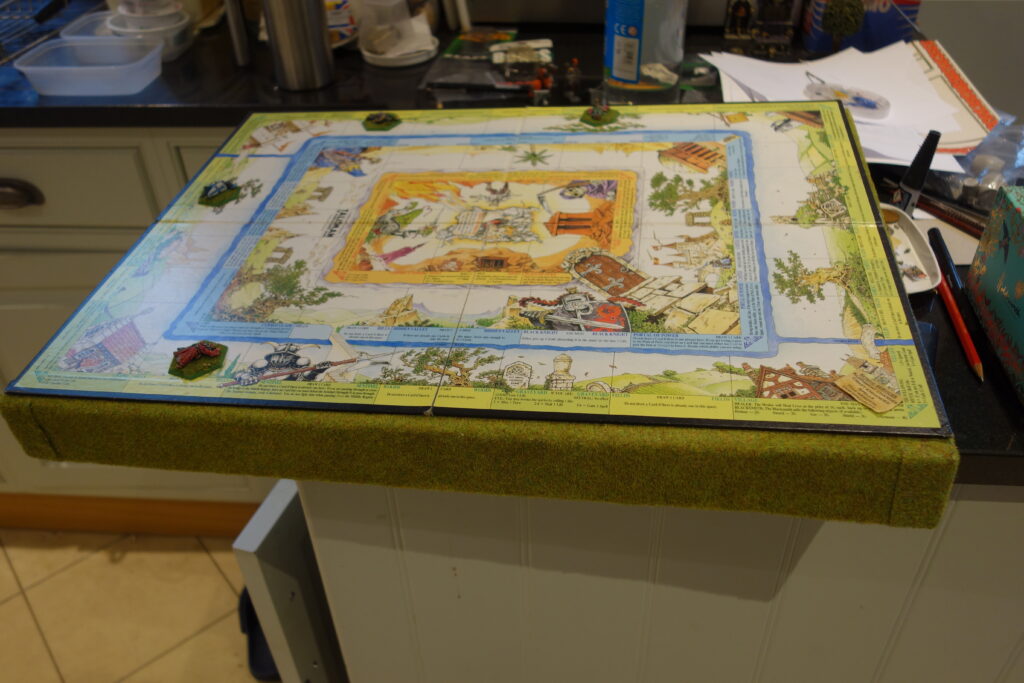
The first job therefore was to raise up the main board on some 2” foam insulation board. This gives it more impact and allows an adventurer to descend down into the dungeon. The foam board was covered with grass matting to blend in with the gaming table.
THE DUNGEON
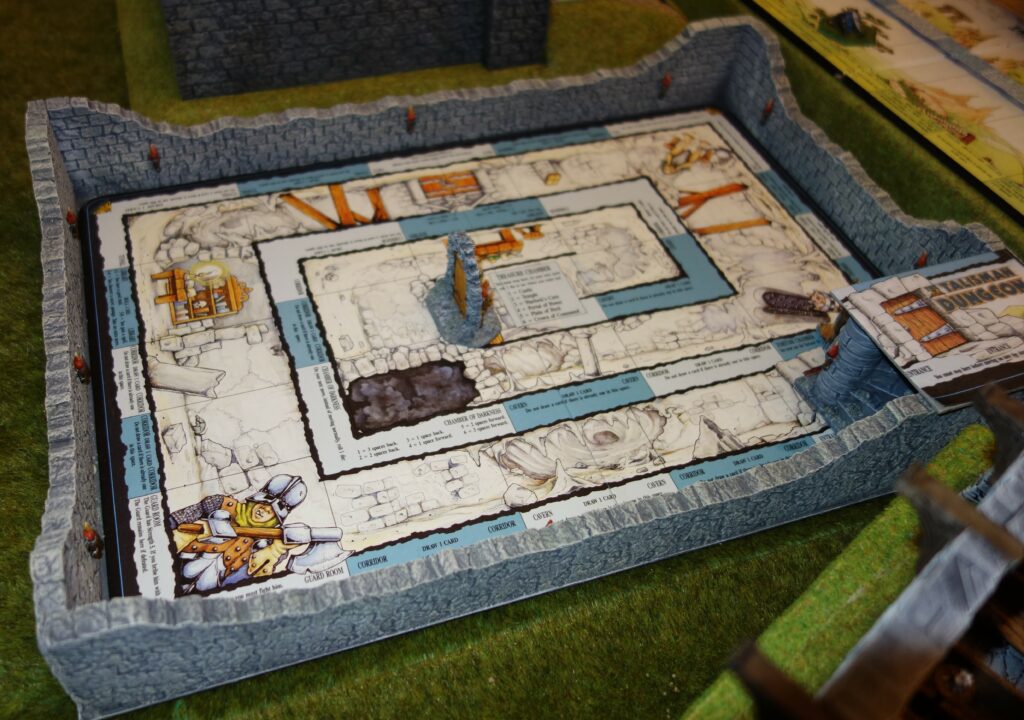
The Dungeon board was placed on a piece of stiff cardboard with holes cut in the bottom so it could be pushed out and put away when not in use. The walls were made of extruded polystyrene (XPS FOAM, WHITE in 10 × 600 × 600MM sheets (RF31011) bought from 4D Model Shop inscribed with stonework, painted grey and then dry brushed.
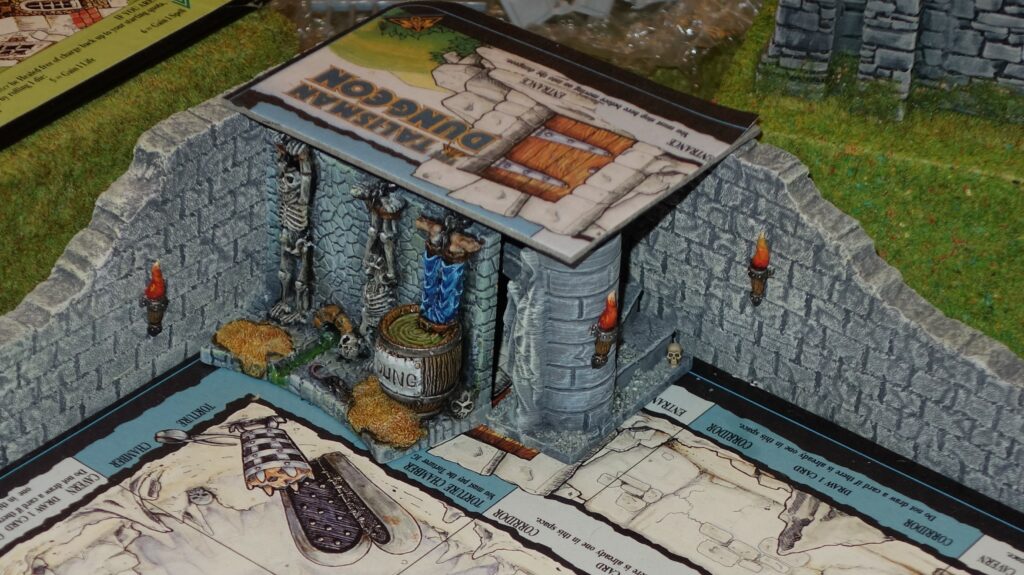
As much as I really like the artwork for this set, I was always a bit confused (it doesn’t take much) with the entrance square showing a green part of the outer region and then you just walk into the dungeon. Being a bit old fashioned I always imagined a dungeon to be underground. I therefore copied that first square and raised it up to ground level and put some circular steps underneath to support it. To fill the gap behind the stairs a part of the Scotia Grendal (SG) dungeon set (F0043) was used. I love the poor unfortunate prisoner upside down in a barrel of dung. Another SG piece, the skull door (10124) was used for the entrance into the treasure chamber but apart from that no other scenery was used. Using pieces already in my collection it would be very easy to place scenery on this board but that would cover up the artwork which I didn’t want to do.
Metal wall torches, also from SG, (ACR17) bring some dim light to the dank underworld though after sticking them in place I realised I could no longer get the board out.
Ho hum. You live and learn…
THE CITY
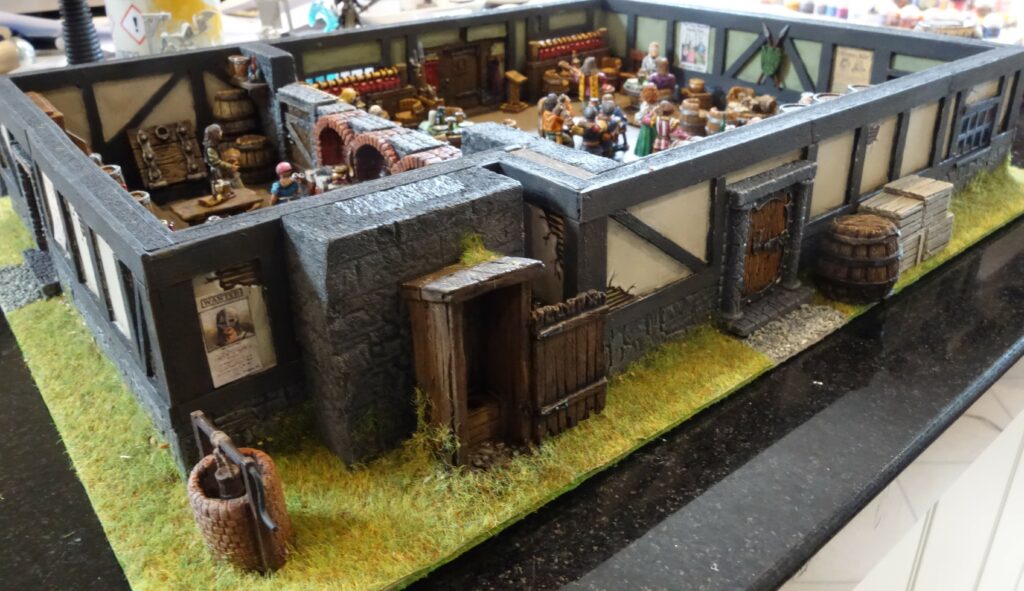
I could be a bit more imaginative with the City as I didn’t mind covering up the artwork. First of all, it had to be walled to protect its inhabitants from all the nasty critters and goons in the outer region. Whilst I cracked on painting the inhabitants my partner did a wonderful job of building the City walls. A piece of 2” foam was used to bring it in line with the main board and then walls and towers were built up using the same foam as that of the dungeon. Stone work was inscribed all around the walls and then dry brushed with several different layers of grey and brown paint. Additional pieces of sloped foam were stuck on to represent the mound the City stands on. This was then covered in green matting.
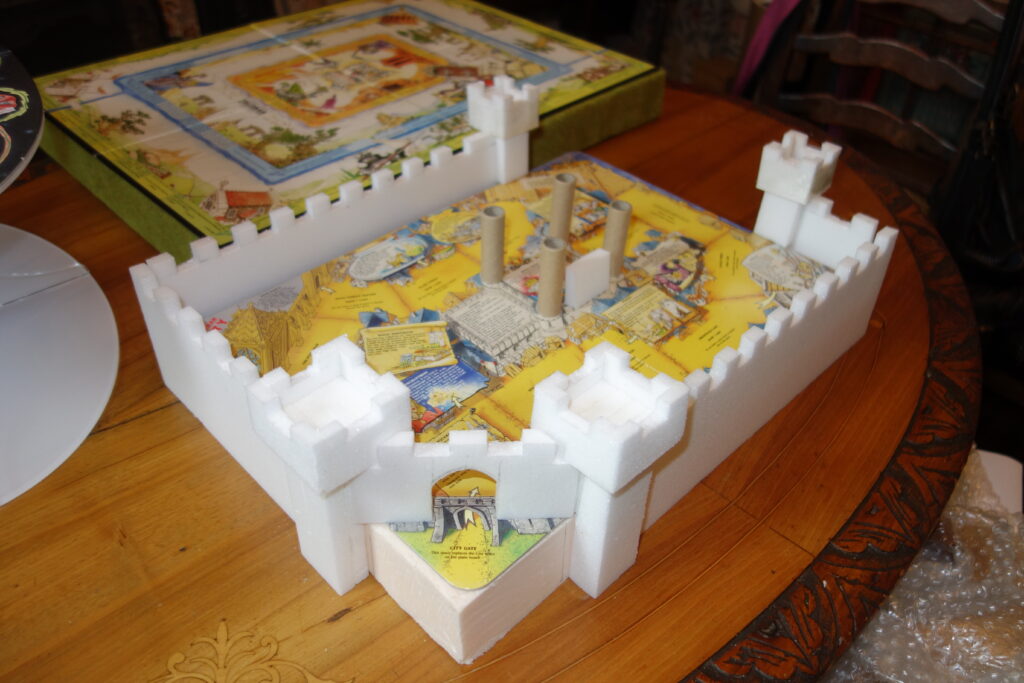

The end piece of wall forming part of the harbour wall was not stuck on the base so that the main board could be slid out and put back in the expansion box when not in use.

The tops of the towers were dry brushed dark brown to indicate planking and hatches and doors in the towers were scratch built using plasticard.
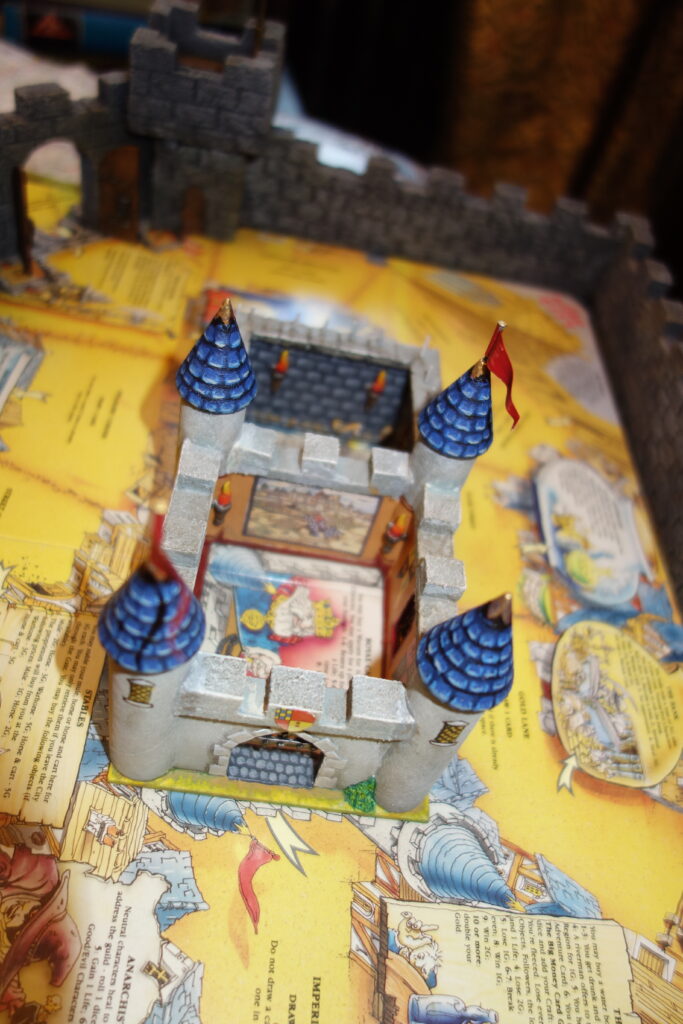
After helping out in the shop at a recent exhibition I had kept the hard carboard tubes used for the paper rolls for the credit card machine. These I thought would make great towers for the Castle.

I wanted to try and match this structure to the artwork but as with the R4th project any sense of scale would have to go out of the window. My partner set to using foam board and scraps from the modelling box. These were stuck together to form the structure but no floor was added so the instructions on the board could still be seen. Pieces of old high density modelling foam were turned to form the pointed spires and two Citadel FS windows were built into the Castle walls. The spikes on top of the donjon were cocktail sticks pushed into the foam. I then set to work with my paint brushes to make it look like a residence fit for a king or a prisoner.
I wanted a City Watch to keep order in its rambling streets and what better figures to use than the Citadel, Gary Chalk, Lone Wolf inspired guards and officer. The King is Theoden from the 1988 Mithril LOTR range. The interior was decorated with SG torches, old skulls and bones and pieces of medieval tapestry and banner artwork found online and printed off. Flags are made from metal tomato paste tubing which is great as it can be bent to shape.

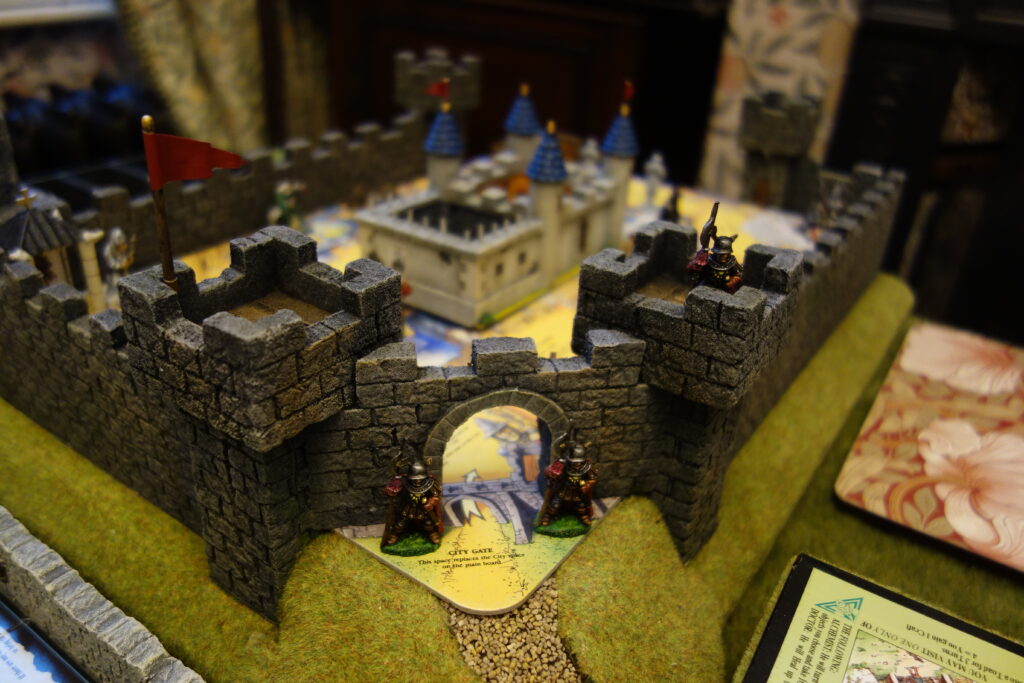
Heavily armoured and stout of heart you don’t want to upset the City Watch
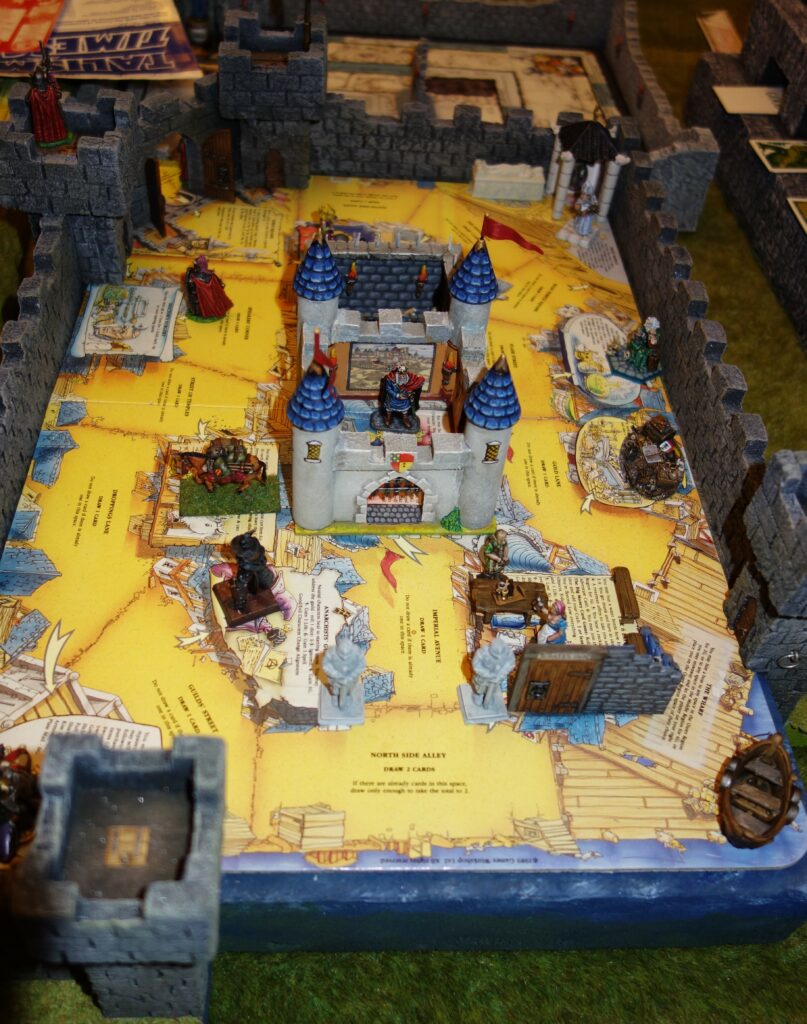
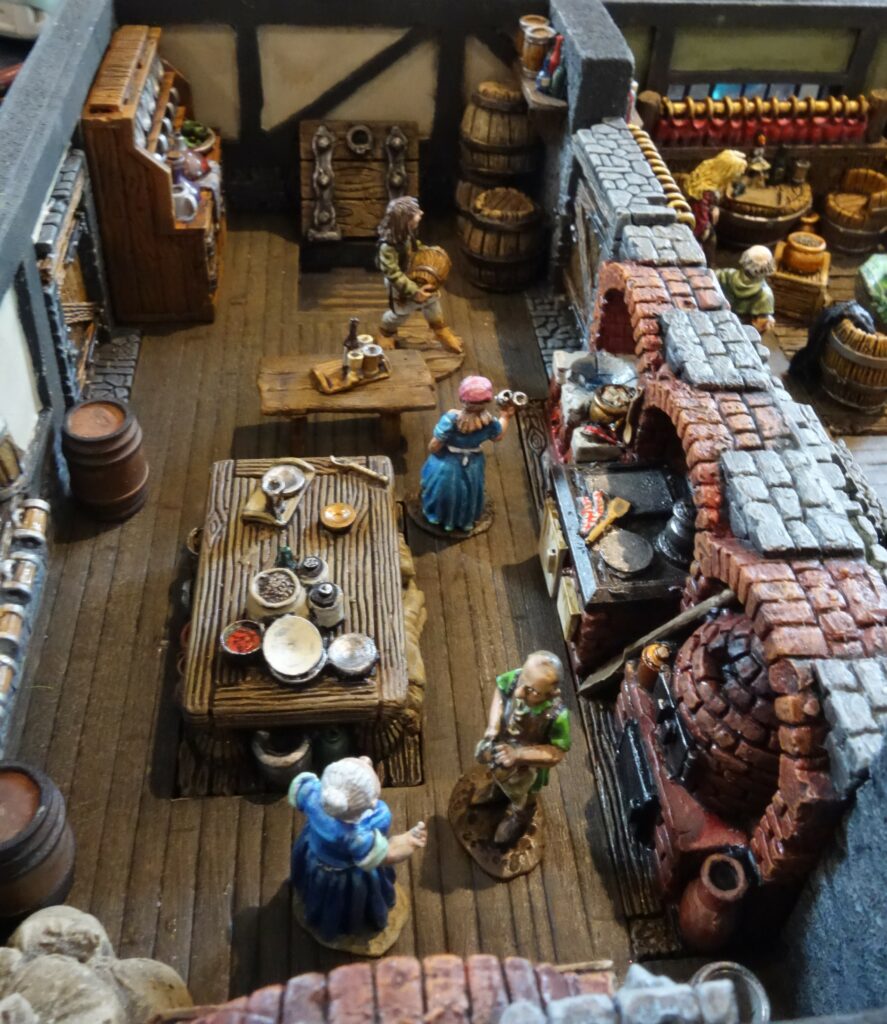
I built the small corner wall of the 6 Fates Inn to show that progress to the north side of the City was via the wharf. I always thought this part of the board wasn’t very well laid out. I have used several miniatures here taken from my R4th 3D set such as the rogue, apothecary and priest. See my other article for more details. Note the city watch captain about to inspect the guard.

If the Timescape Scientist isn’t used in the game I will use him as my doctor as he matches the art work quite well.
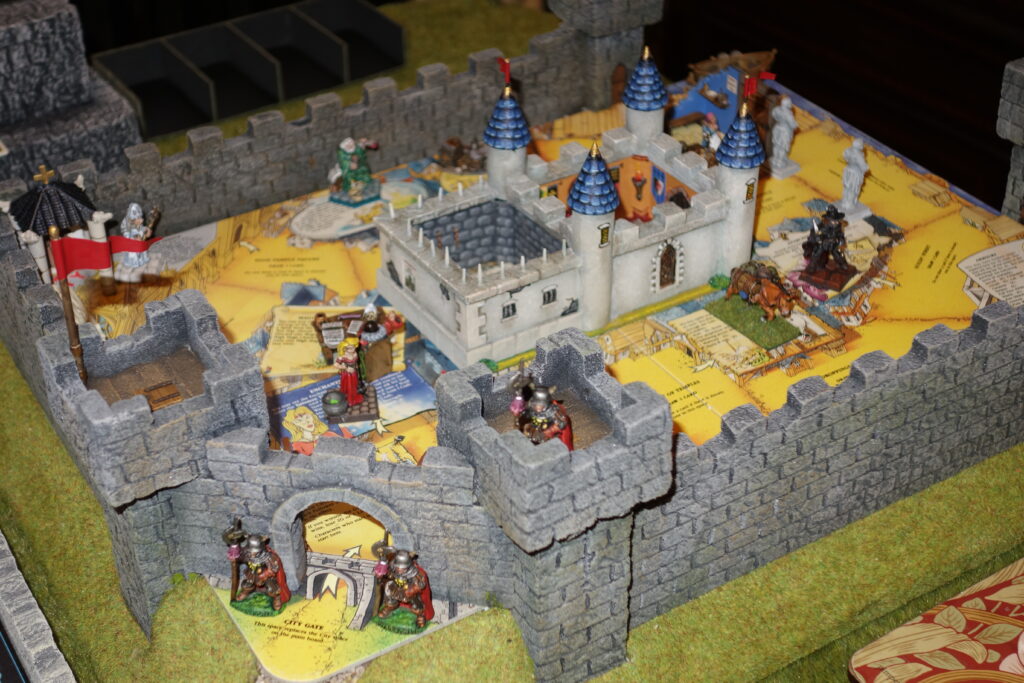
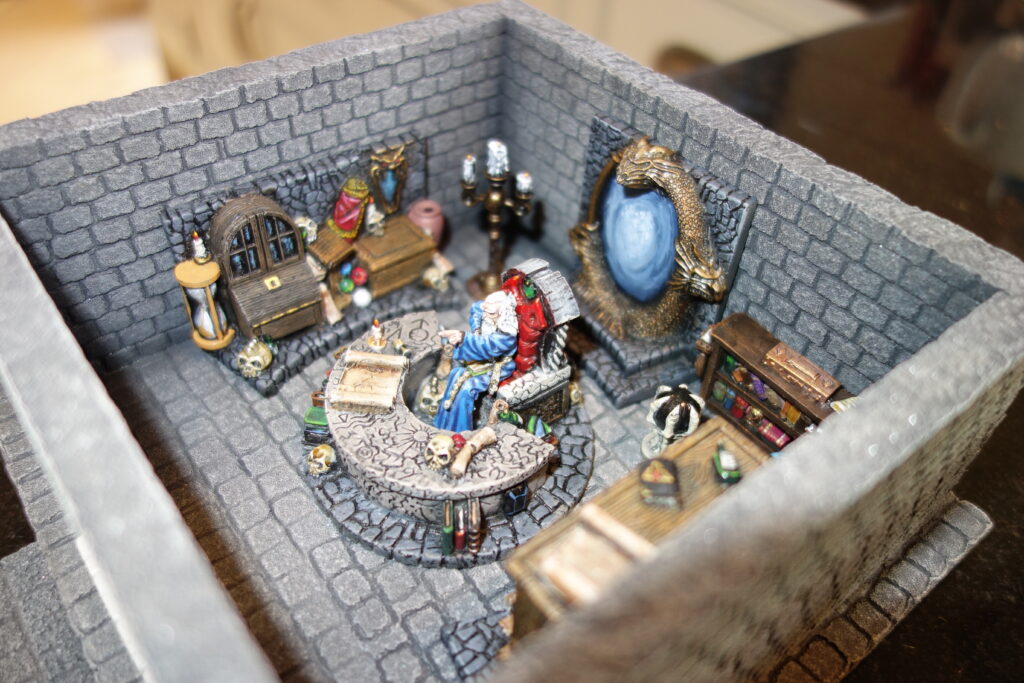
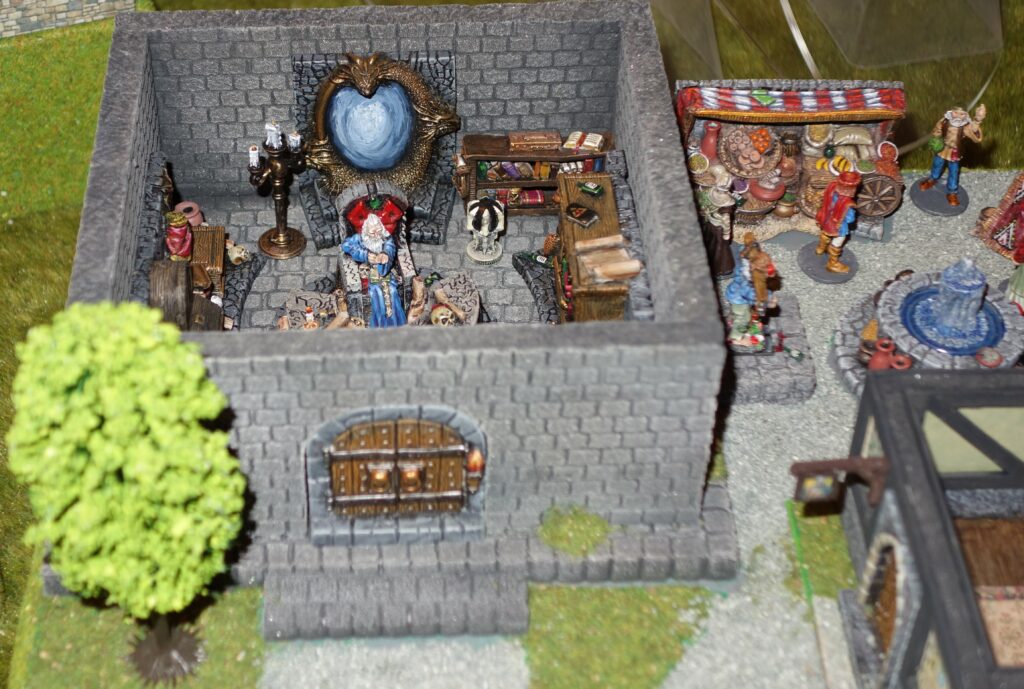
The Magic Emporium is owned by the Ral Partha wizard from the Wizard’s Lair set and the enchantress is the Death on the Reik Etelka Herzen witch with a Citadel FS cauldron stuck on her base.

Whilst undercoating some of the statues for my City a real life dragon alighted on one of them. They are magnificent creatures and it is my favourite time of the year when they hatch and fly around our pond decimating the midge population.
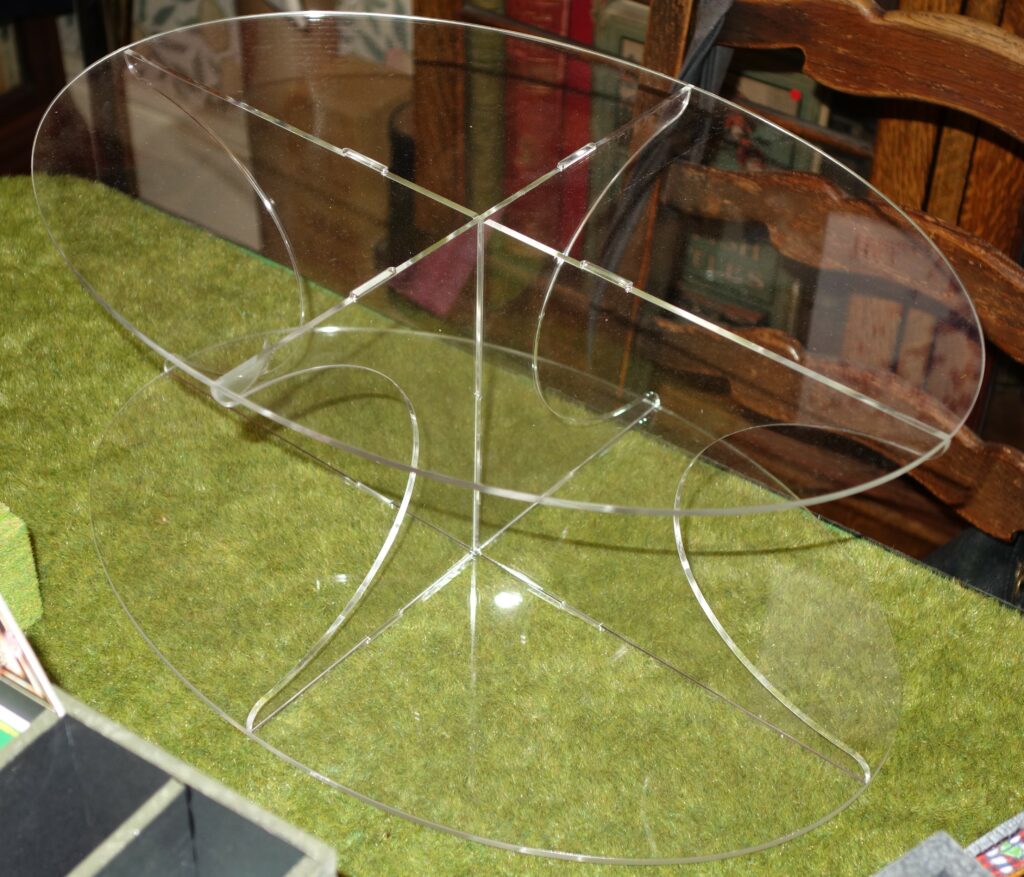
THE TIMESCAPE
This was the easiest of them all. My partner suggested the idea of having the Timescape ‘floating’ using a clear Perspex stand which I thought was a great idea. We made a template and gave it to a local Perspex manufacturer and they came back with this lovely item which works really well in detaching the Timescape board form the rest of the game but still making it accessible to use during play.

OTHER AREAS
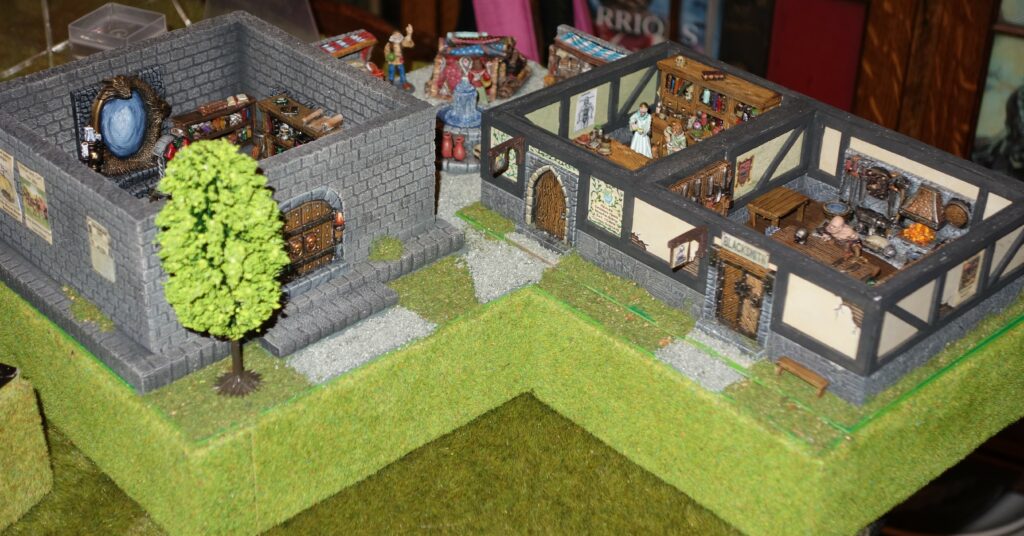
With the three main boards done our large(ish) gaming table still looked a bit sparse so my gaze fell upon the remaining three corner squares and my collection of Scotia Grendal scenery. A Tavern and Village could be achieved really nicely using models from their range. Note: I do not work for Scotia Grendal nor do I have any connection with the business, I just love their range of models and think they really complement Oldhammer miniatures when presented together in a diorama!
THE TAVERN
Though it would retain the same instructions as that found on the board, I have always wanted to create a Talisman tavern scene. This 3D project gave me the perfect excuse.
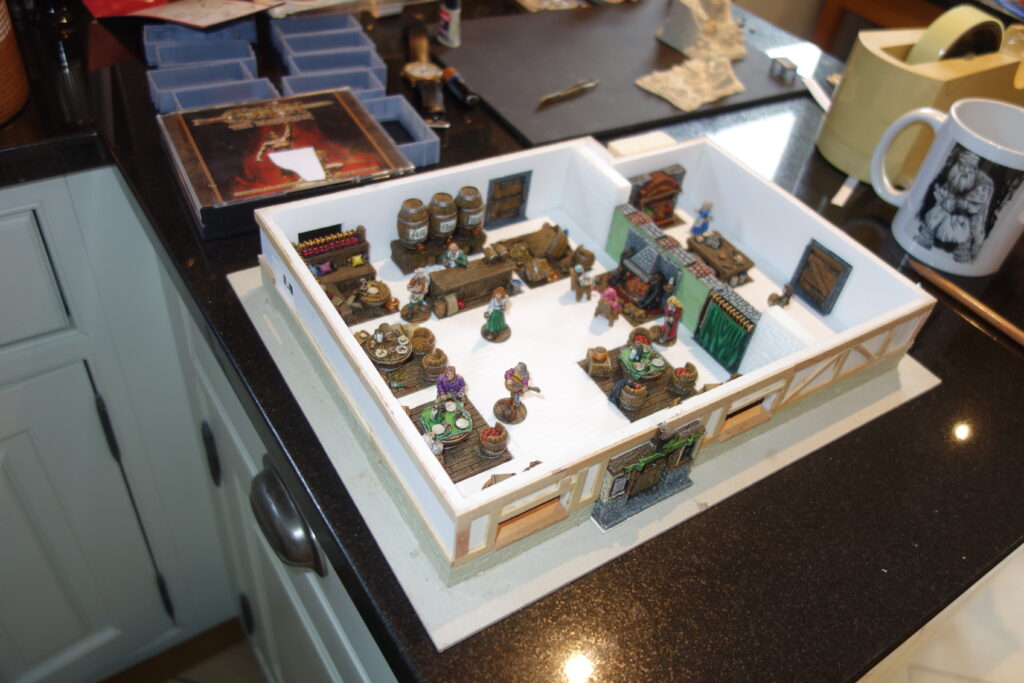
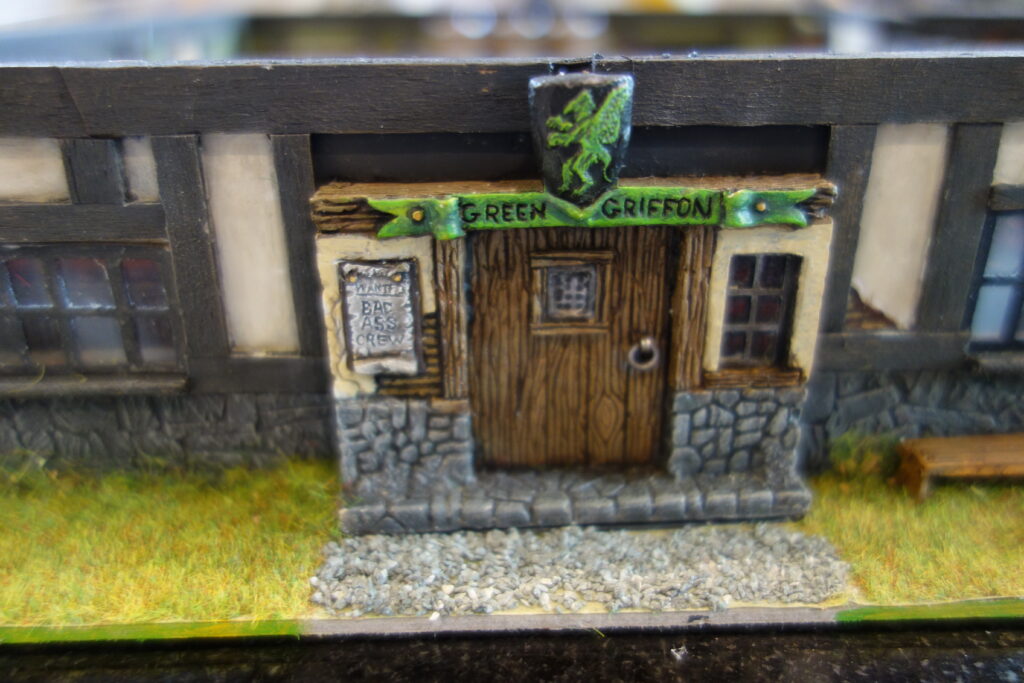
Now known as The Rising Sun, The Green Griffin is a favoured drinking hole for the weary adventurer.
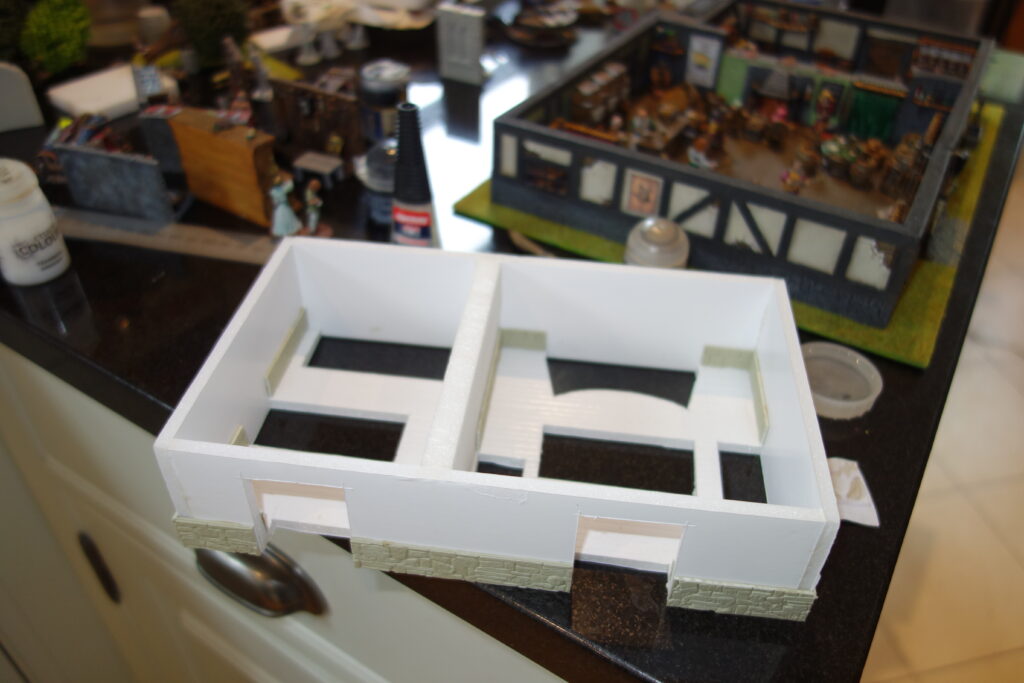
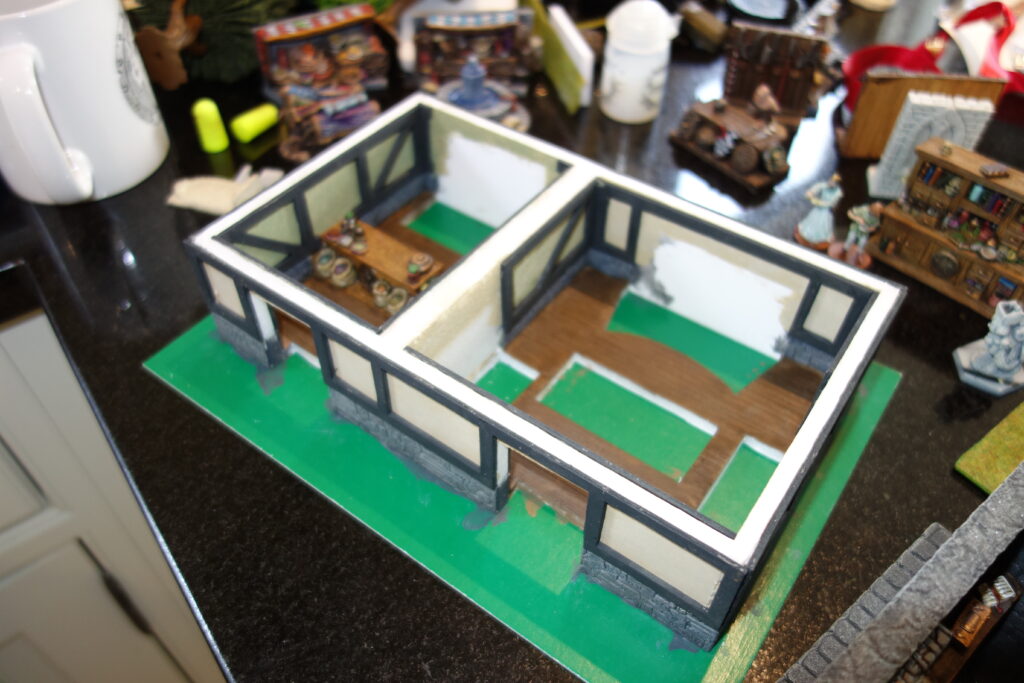
Once more my partner went off to the shed to create the building shell out of foam board, cardboard and lolly sticks whilst my paint brushes smoked, slapping on layers of paint and my credit card groaned as more and more bits were bought.
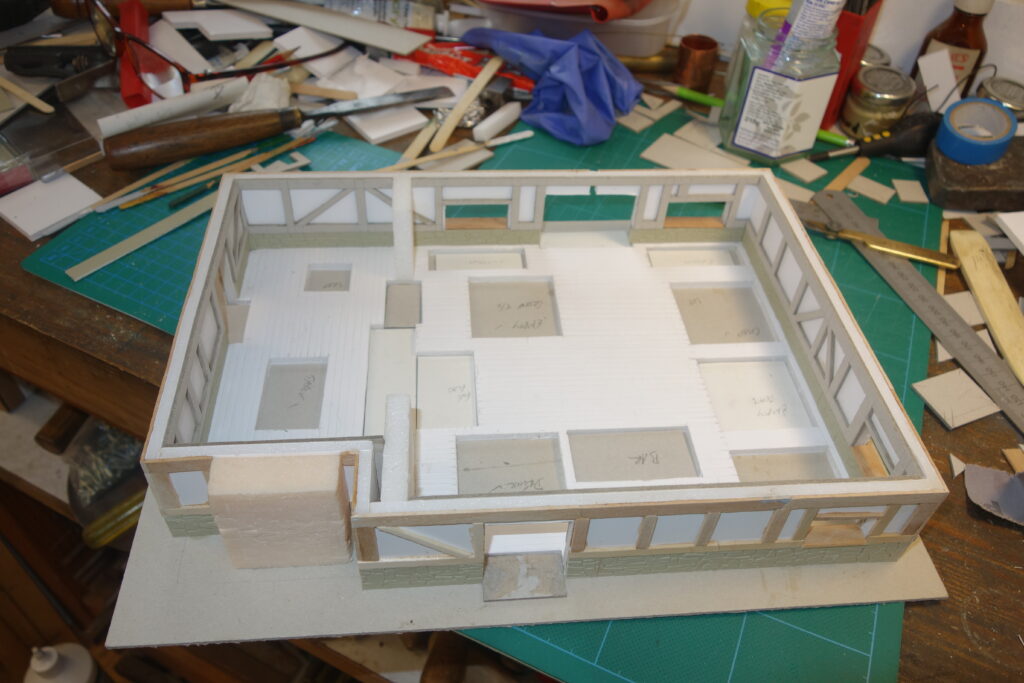
Slots were cut into the foam board to take the individual SG pieces many of which come on their own bases. The foundation walls around the base of the Tavern are plastic SSMP228 Wills Kit OO/HO Gauge Random Stone.
The timber framing is a mixture of lolly sticks and when we ran out of them 2mm greyboard. The plaster walls are made from foam board. Best to paint both before you stick one onto the other as this gives a crisp paint line between the two and saves a lot of time. Windows were made from some clear plastic from a cream cake box and cardboard coated in black shellac. She really is a brilliant model maker.
I then painted on various details such as cracked plaster work and printed miniature posters to stick both inside and out. I wanted a Talisman theme for the Tavern so have included all of the different die roll results in there. There is the man collapsed in the corner being watched by the weary city watch soldier whilst his two colleagues live it up. The farmer is there clutching his chicken and casting a longing eye at the painted trull. Whatever you do don’t insult Colin his chicken. He loves that chicken and takes it everywhere with him. A gambling table is always operating for you to either win or lose a gold, a magician waits patiently for his meal and is happy to teleport you somewhere else so he gets his food first and standing by his advertising sign is the boatman. This is the Muleskinner from the Citadel adventurers cart set with a back pack glued on, Miliput feathers stuck on his hat and a hole drilled though his hand to take a staff. I had to get my magnifying glass out to look at the artwork on the board to match up the correct colours for his clothing. Great fun.
Weary, cold, hungry and footsore what better place to unwind. With its strong ale, wholesome food and roaring fire it’s the perfect place to rest your tired bones.
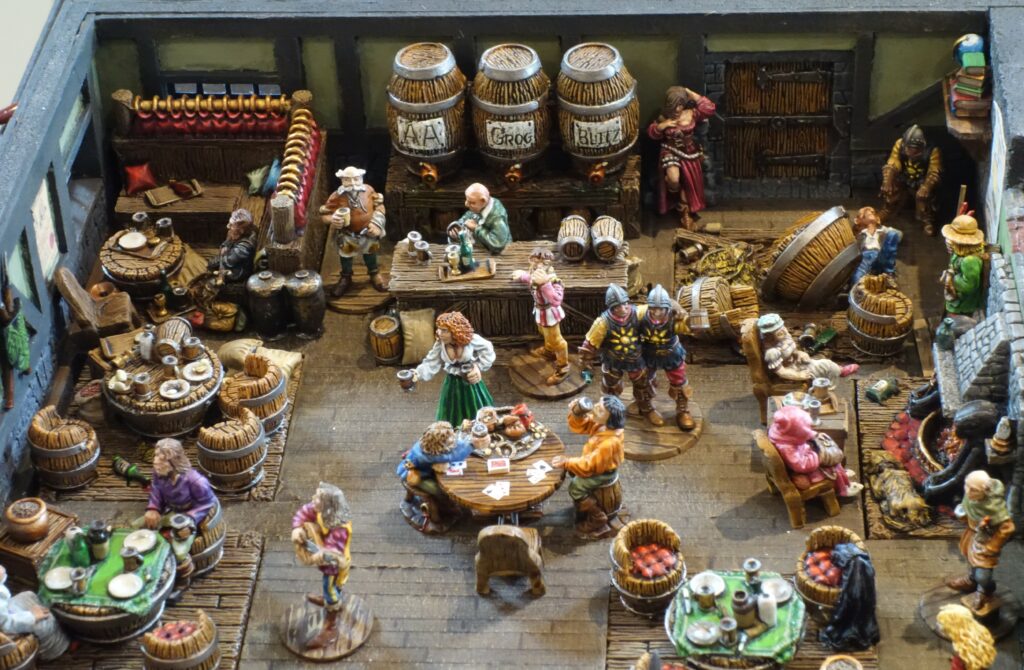
You can almost smell the pipe smoke amidst the rattle of flagons on table tops and bawdy conversation. Many an adventurer has sat at these tables and bragged of his heroic ability to claim the Crown but most are never seen again.
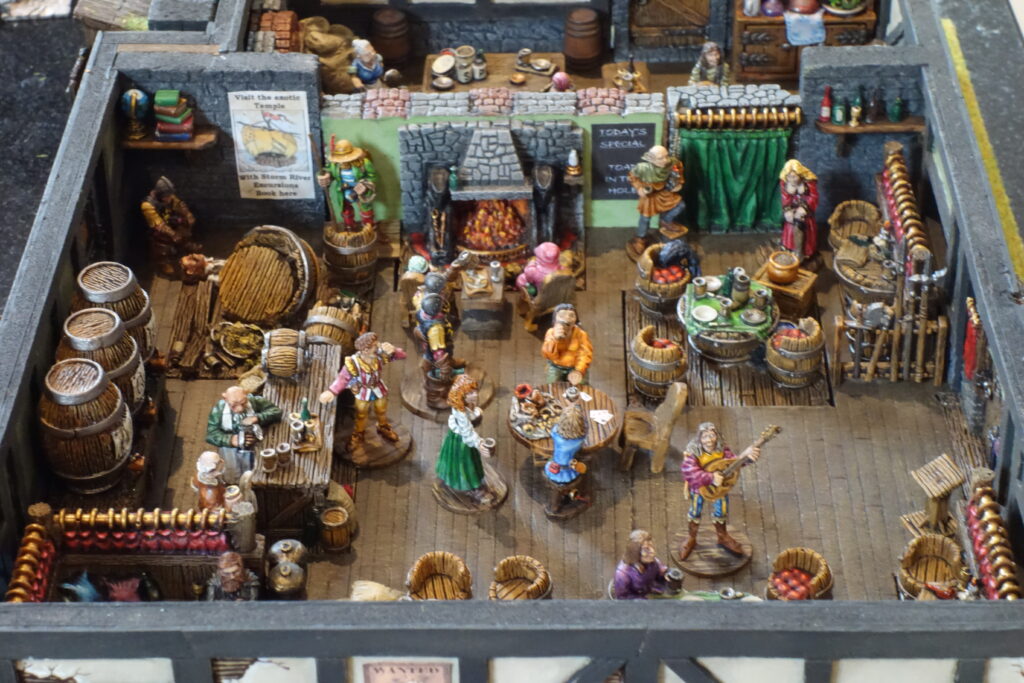
After finishing your meal, you can take a trip on the ferry to the Middle region.
Trying to sit quietly and sup his ale, the wizard, getting agitated, is about to teleport the annoying bard to the Horrible Black Void.

Your seat awaits to try your luck and win some gold!
Toilet facilities look a bit grim though it might be the only flush you get if you have bad luck at the gaming table.

He may look like a harmless old farmer, but insult Colin his chicken and he’ll have ya!
Adjusting her suspender belt the painted trull seems non plussed by his advances (or his fulsome fowl).
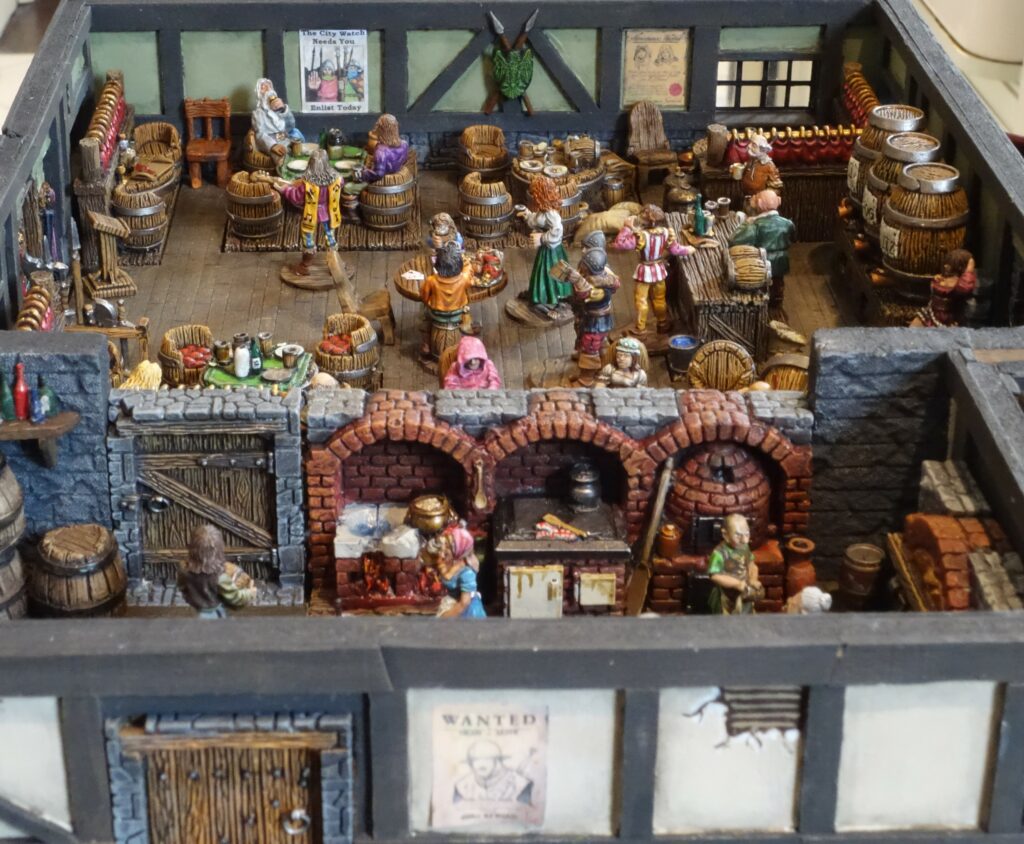
The busy kitchen preparing toaday’s special of Toad in the Hole.

Most of the items in this set are available from Scotia Grendal. The pieces used were: –
Pub snug (10006), Tavern kitchen (10035), Green Griffon Inn (10066), Tables and chairs (10067), Single doors (10082), Single doors II (10095), Bottles (A) ACR01, Bottles (B) ACR02, Round table ACR05, Tavern outhouse (ACR126), Bar staff GFR0168, Bar patrons drinking (GFR0174).
Non-SG pieces were from the early Citadel FS range which included FS57 Innkeeper, FS58 Inn keeper’s wife, FS59 serving wench, FS65 Seductive wench, FS67 Brawny adventurer, and FS Mysterious stranger. The C62 Street tavern girl, C42 Town guard and E27 Town guard sitting are from 3D resin prints.
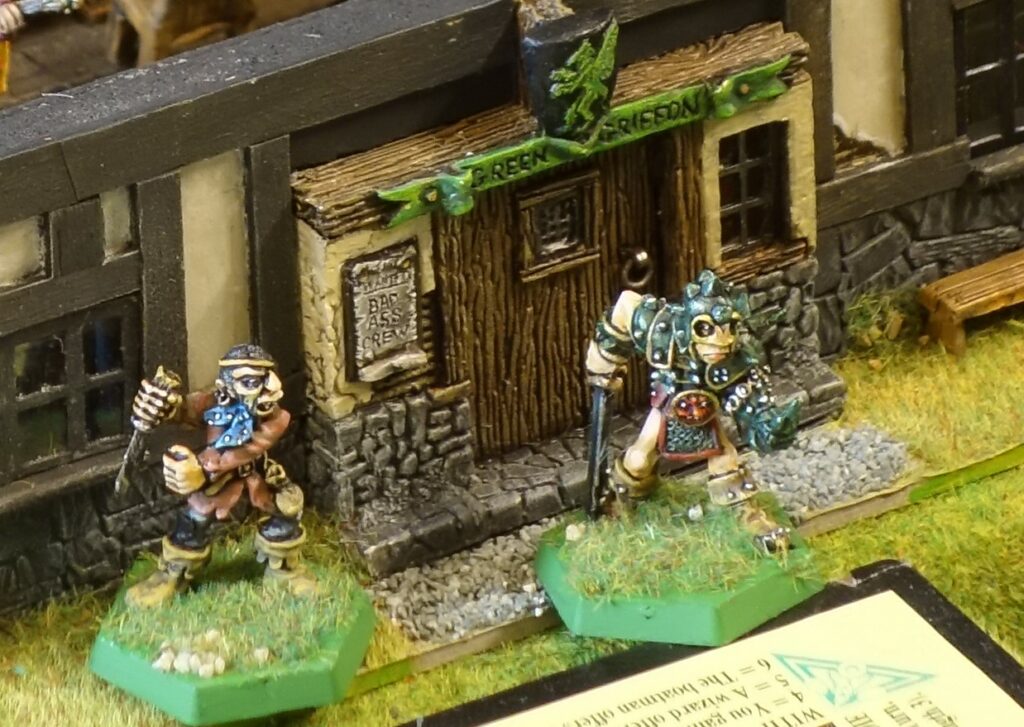
Two bold adventurers set off on their quest from the tavern but by the evil look in his eye the Rogue looks like he is about to eliminate the competition.
THE VILLAGE
I already had some SG village pieces that I could adapt for this corner but had to once more visit their website to buy some additional sets to complete my vision.
Two inch insulating foam was used for the traditional ‘L’ shaped corner piece and then the SG sets laid on top to work out where the three main buildings of the Mystic, Healer and Blacksmith would be. I also wanted to use my SG market stall set in a village square that would play no part in the game but would just look nice as table candy.
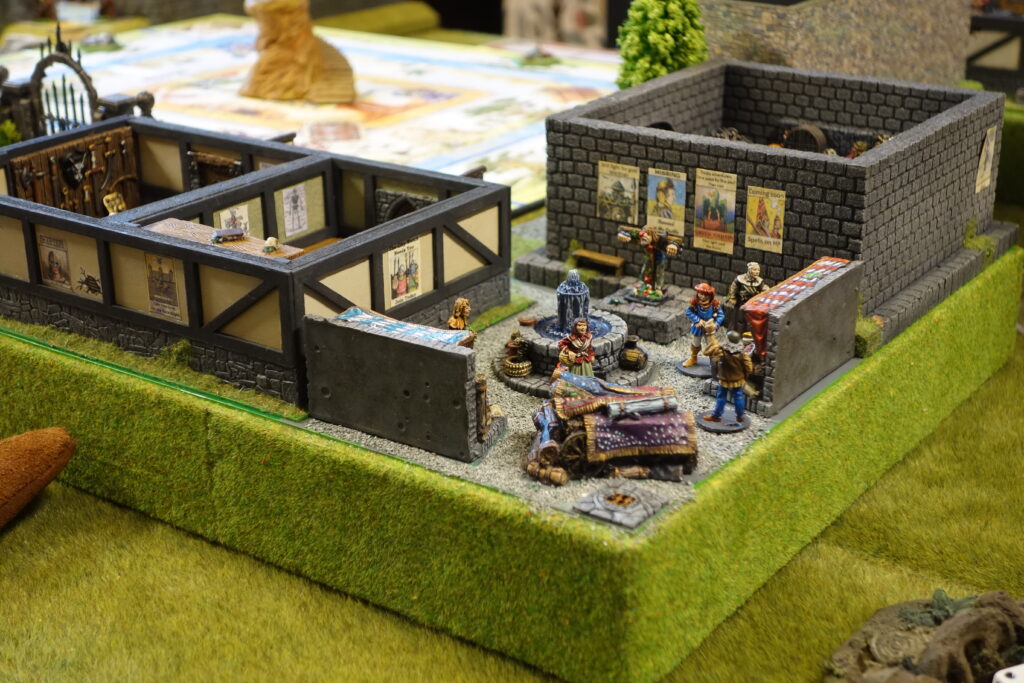
Note the Tax Collector of Adventure card fame spending some of YOUR gold!
The Healer and Blacksmith buildings were created the same as the tavern with slots cut out to take the SG scenery pieces.
With all these scenery pieces space was left around the furniture to place a 25mm hex base meaning you can place your mini in there. This was then based on some stiff cardboard and painted. The Mystic’s room in a ruined tower was made the same way as the City Walls.
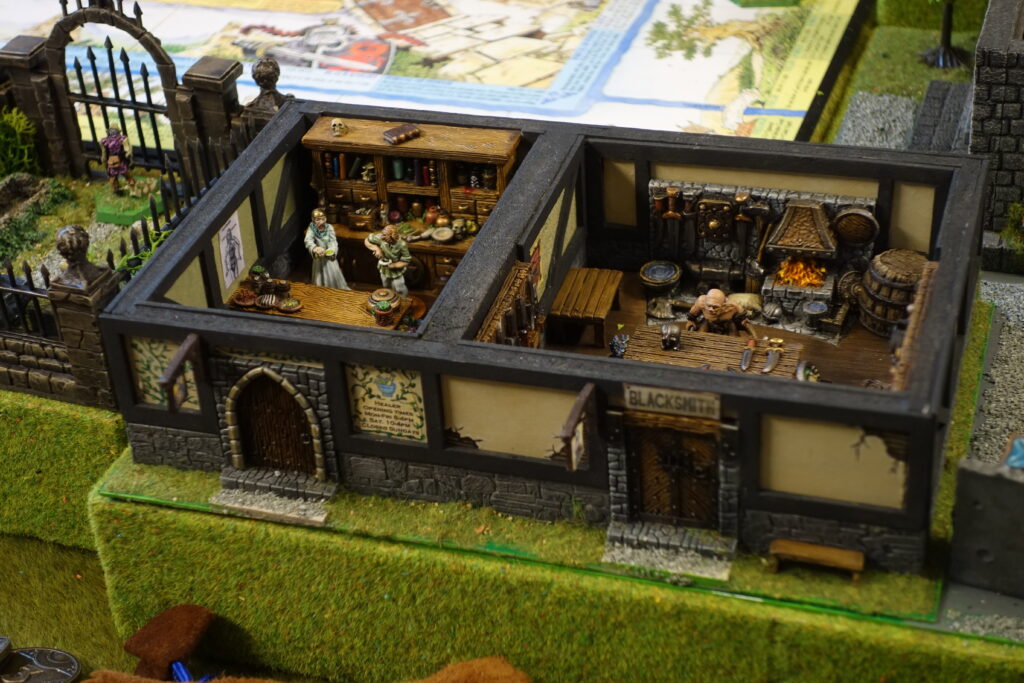
Buy your new axe from the blacksmith then immediately visit the healer after slicing off your thumb in a pathetic weapon swirling Conan impersonation.
Advertising slogan “You won’t make a Mystake by visiting our Mystic. Services include Alignment changes, spells, and craft enhancement. Hag removal is our speciality.”
Like the Tavern a lot of the pieces in this little diorama are from Scotia Grendal and include Bar patrons (GFR0172), Wizards conjuring (GFR0173), Apothecary’s shop (10023), Armourers work shop (10047), Magicians study (F0028), Fantasy Bizarre (F0048), Tavern signs (ACR13), Wall torches (ACR17), Single doors II (10095) and Double doors III (10142). There is also the book case from the Ral Partha wizards lair and the unfortunate chap in the stocks is the C46 villager from Citadels ‘C’ series of minis. The blacksmith figure is also from the early Citadel villager’s range.
THE CHAPEL
Whilst looking for Chapel furniture I stumbled upon this new (well to me anyway) sort of fantasy scenery using individual blocks 3D printed that clip together. A company called The Artificers Forge were advertising chapel furniture on e-bay but had it presented in a rather nice Chapel setting.
I decided to make further enquiries to see if it was suitable scale wise to use for my own chapel model rather than making one (much to my partners delight and relief). I contacted a chap called Jim Westhead at the company and a bespoke piece was made up for me. He was really helpful and the service I received was first rate. Thanks Jim!

As I had no intention of taking it apart once built the dividing lines between the connecting blocks were milliputted and it was then undercoated and dry brushed.
The scenery pack was then enhanced with various clerical accoutrements such as carpets and religious symbols and it was mounted on 2” foam to bring it in line with the main board. After all the dry brushing, the windows were picked out in a lighter colour and foliage was added to break up the grey of the walls using vines from Citadel Creeping Vines box set.
The cross was made from lolly sticks and the carpet was an old ribbon from a box of chocolates. The lace runner on the altar is a garlic bag and the communion set is made up of SG bottles and candlesticks.

A welcome sight indeed as you stagger, battered and bleeding towards hallowed ground. With your one remaining life oozing out from between the cheek pieces of your shattered great helm you collapse upon its velvet carpet your own blood enriching its scarlet hue.

Here endeth the lesson. Now don your armour once more and fight the good fight.
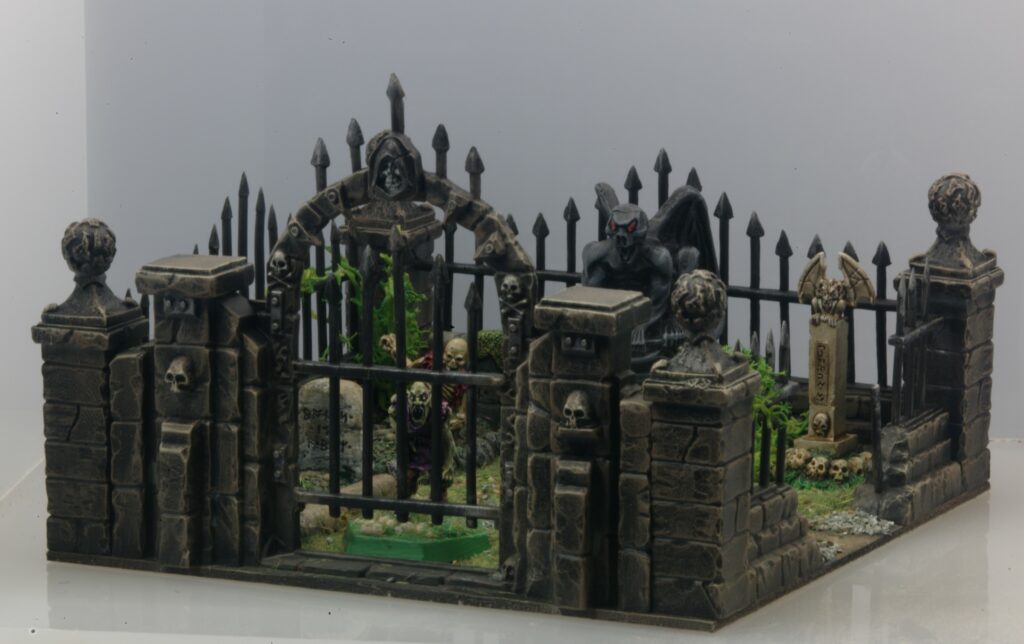
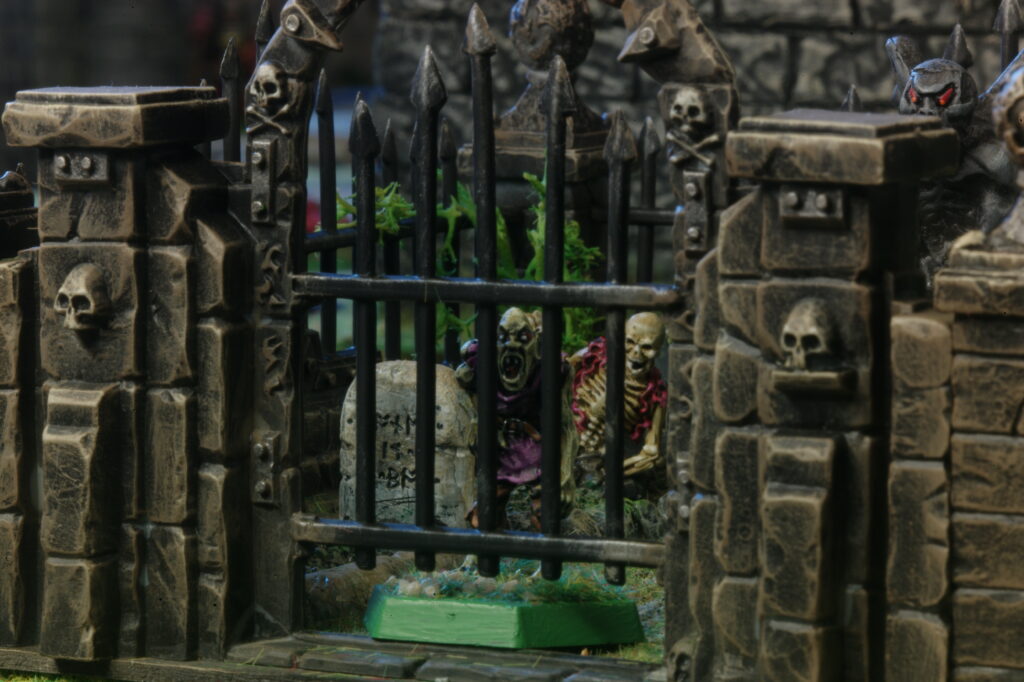
THE GRAVEYARD
Though not a corner square the Graveyard is rather iconic and a starting point for many an adventurer so with a little bit of space left and a scrap piece of 2” foam I decided to try and make one. I already had some SG graves that I had bought and painted back in the early 90’s and thought it would be nice to finally use them for something Talisman related.
I would need some walls/fences to keep stuff out (or in!!) and a search on line resulted in finding this Reaper Bones Harrowgate graveyard set. The spiked railing heads look really menacing and evil so I decided to roll the dice and buy a set hoping they were the right size. They were perfect as can be seen in the photographs. I didn’t need to use the full set so the remaining walls and columns now lie in my spares box for a future project.
The graves are still available from SG (F0026) and the grim looking menacing gargoyle is from their Demonic Altar and Pillars (10063) set. The Hydras teeth skeleton rising up from his slumber and the smaller memorial are the Reaper Dark Heaven Legends Undead Rising (02043).
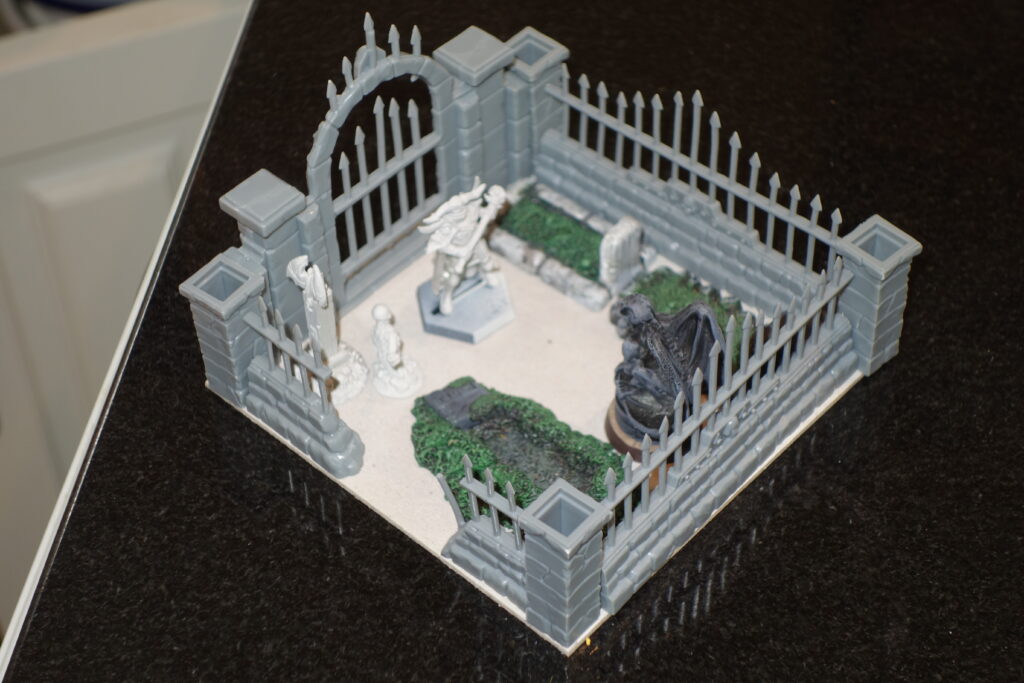
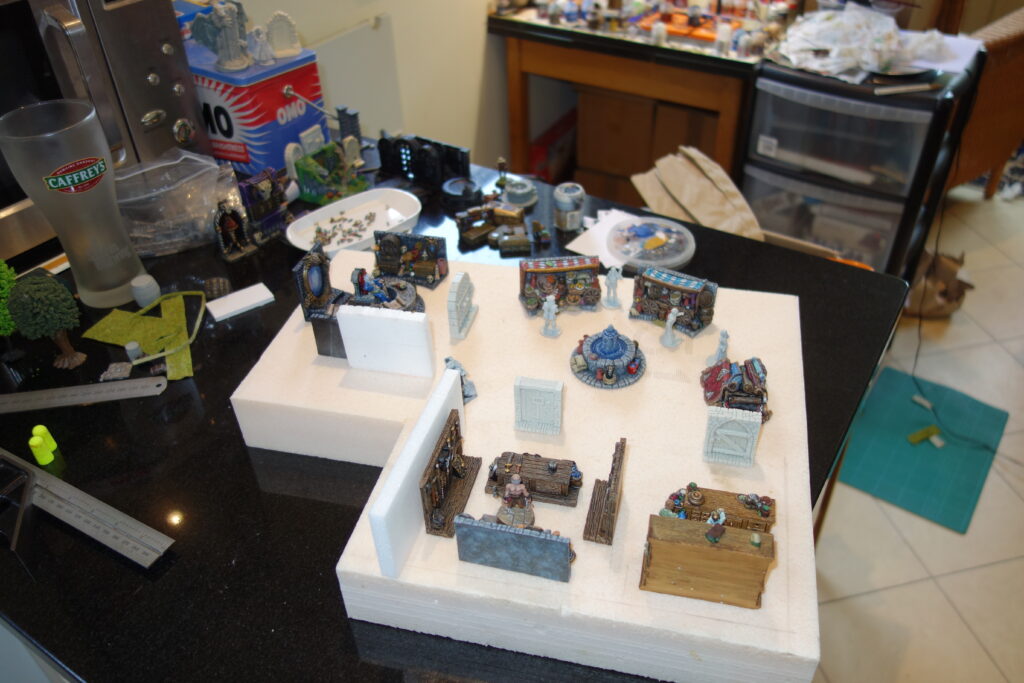
Always best to arrange stuff first before sticking anything down to make sure everything fits.
Whoever or whatever left that empty grave managed to burst through the railings and now wanders the Outer Region. You know, on second thoughts, I’m not really bothered about the quest. I think I might just stay at home and have a nice cup of tea.
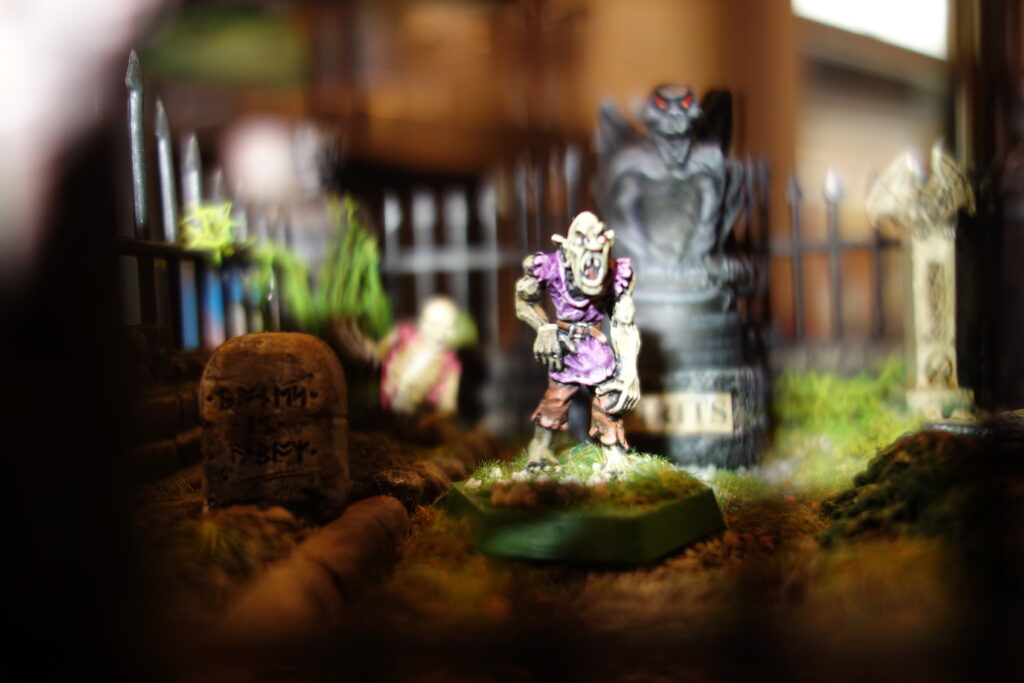
Forgive the blurred image but my hands were shaking at this point!
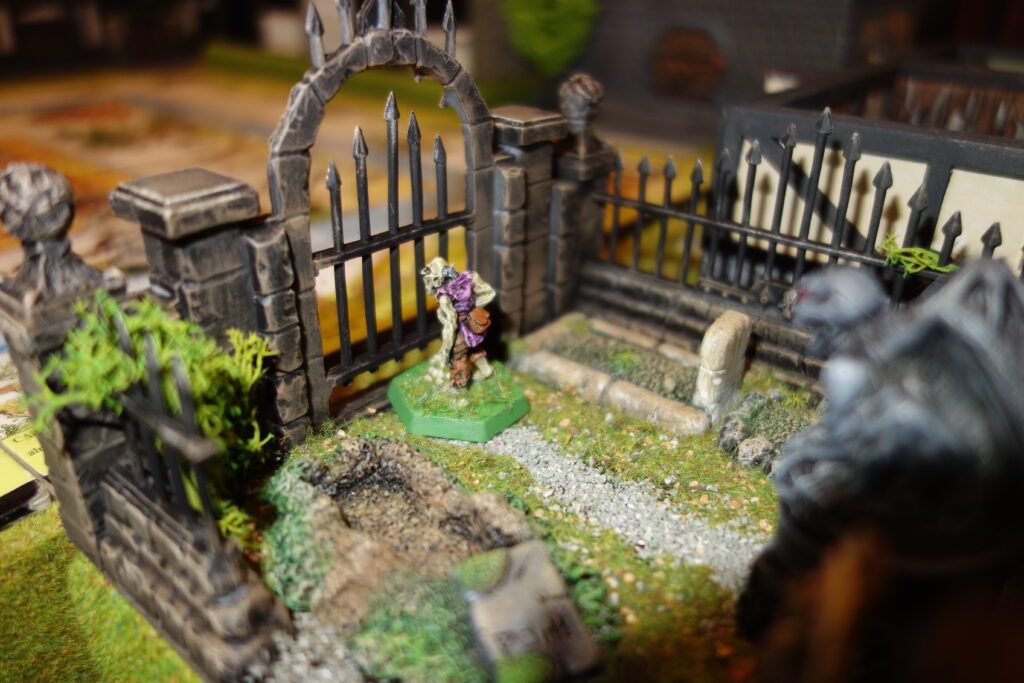
As night falls the Ghoul sets off in his quest for the Crown of Command.
But is quickly foiled by the intricacies of the Graveyard’s iron doorway. This could explain why he walks with a strange gate.

This ruined and abandoned Temple is the perfect place to display the various cards and counters.
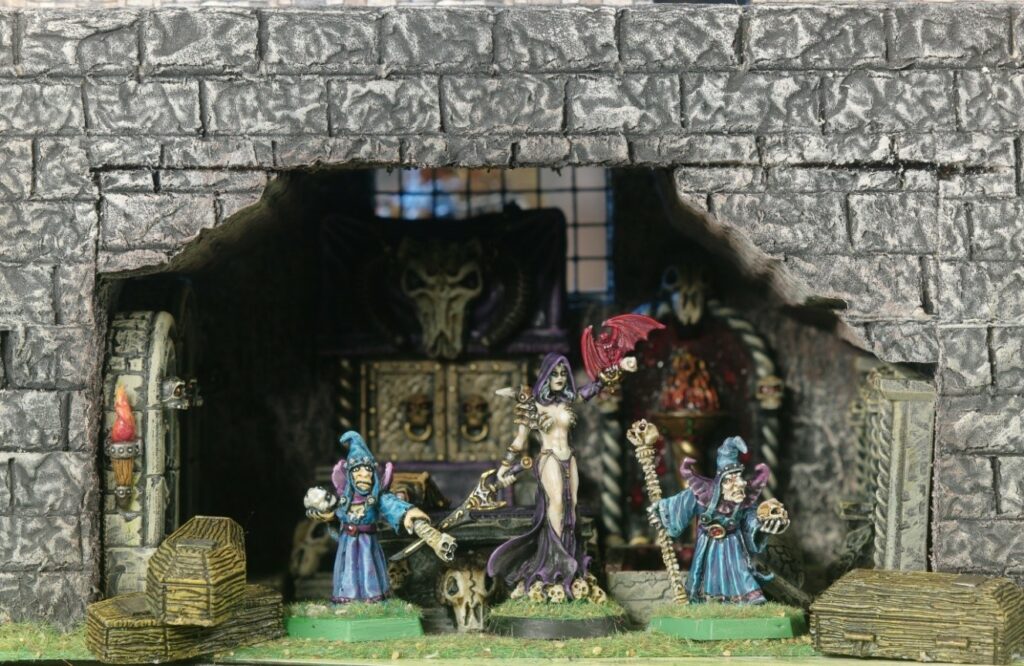
But what sorcery is this nestling amidst its crumbling walls. A nest of nasty, necromancers!
So, this explains where all the undead that haunt the Talisman regions come from.
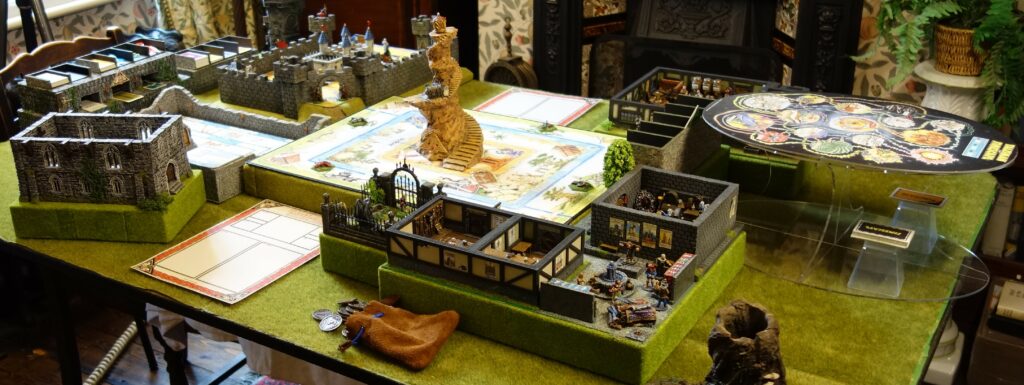
As always trying to photograph the whole table with only limited space is really tricky.
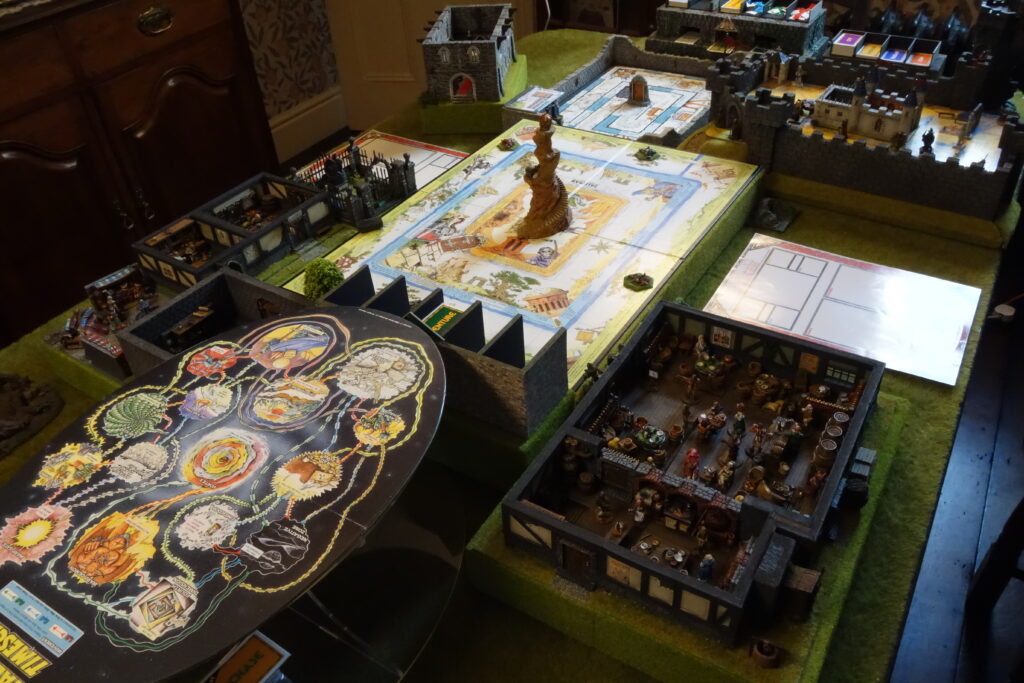
Is it me or does the Timescape look like a huge Independence Day alien spacecraft about to rumble over the board and station itself above the Crown of Command?
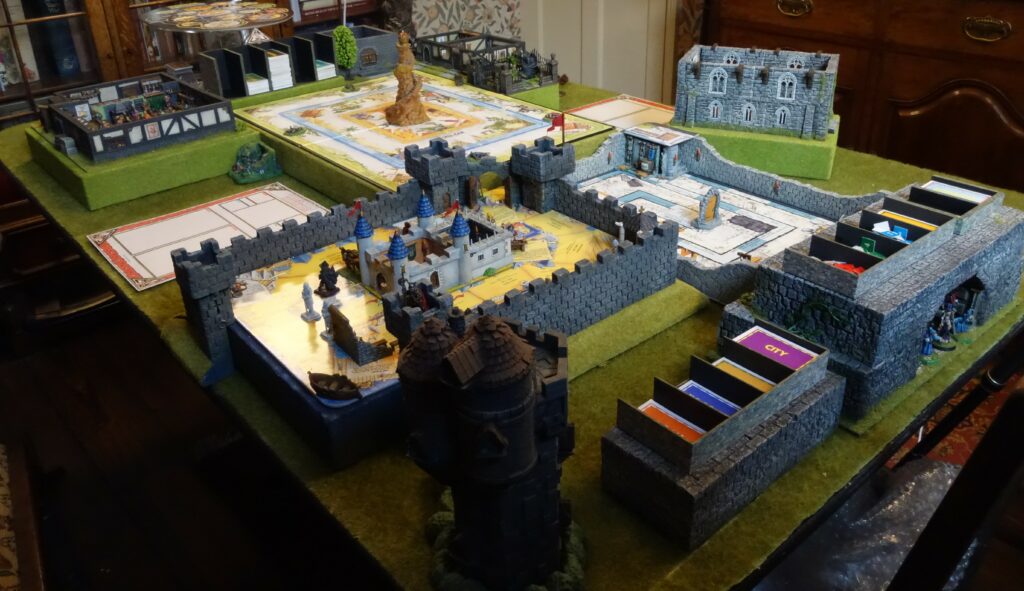
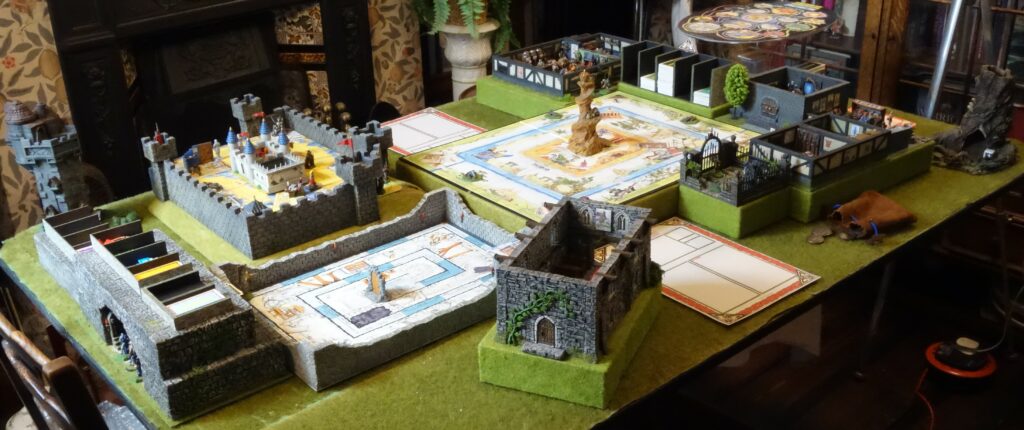
After three months’ work all is set for the 40th anniversary birthday bash. Collecting, making and painting this lot has been great fun and though the corner piece are rather over the top for a single square, I think they look smashing. I now have my very own Talisman Tavern, Chapel, Blacksmith, Healer, Mystic, City and Dungeon. Right, time to don my armour, sheath my sword and set off for some more Great Adventures in Wonderland.
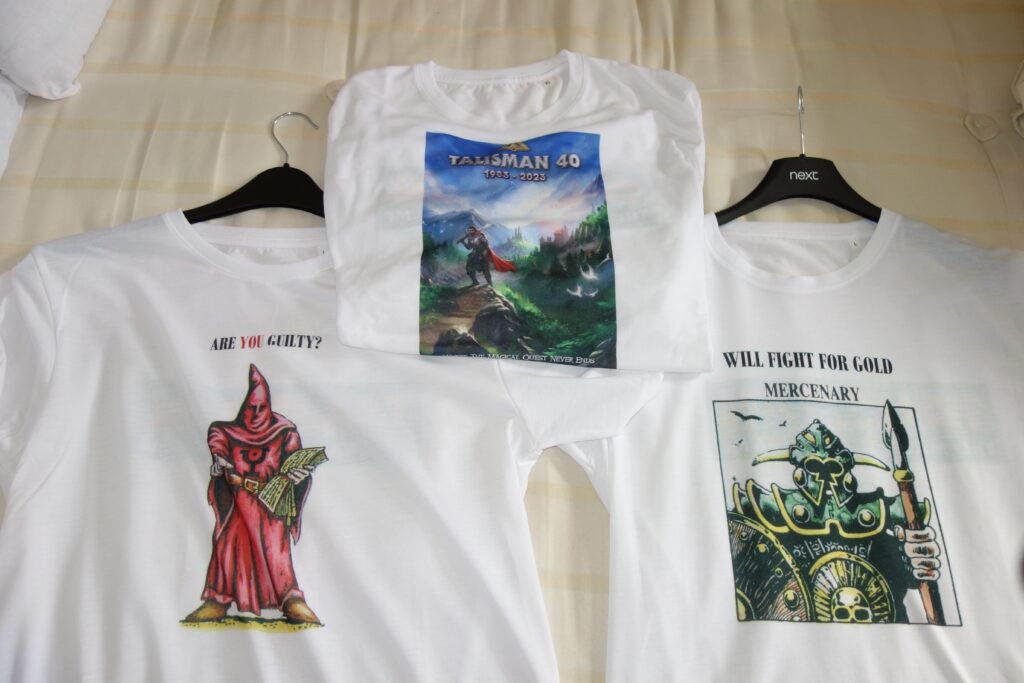
40th Anniversary apparel showing my favourite character and adventure card. But which to wear on the 5th November? T-shirts are perfect for when you fancy a brew.
/KB 10-2023