 |
As a lifelong Talisman fan who bought her first set in 1985, and a collector of Citadel Miniatures, I had often wondered over the years about combining the two to make a 3D board. I loved the idea of being able to stroll through actual City Gates or physically go down into the Dungeon from the Outer Region.
With a game like Talisman, it is the implied narrative of the artwork that has the hard work of taking you into its alternative world. In 1st and 2nd Edition, whether strolling through a blustery Graveyard brushing fallen leaves from your armour, or gazing up at the distant birds in the Hills, Gary Chalk’s wonderful and iconic artwork did this admirably, transporting you into different regions and faraway lands. I still get a warm glow when I see it now.
Because of the love of his artwork, I didn’t really want to cover it up with little lead people or scenery. Also, back in the 80s my pocket money would only stretch so far, and I could only afford a couple of miniatures a week meaning I missed out on Citadel’s early metal furniture and scenery. As the years rolled by, life’s own adventure got in the way of things, but the 3D idea was always there in the back of my mind, like a mental itch waiting to be scratched.
Skull infested 3rd edition dabbled with the 3D idea with the cardboard Dragon’s Tower and also introduced the two new realms: the Highlands and Woodlands. Now you could amble amongst the trees or climb up into the mountains in search of loot and glory. Corrr!
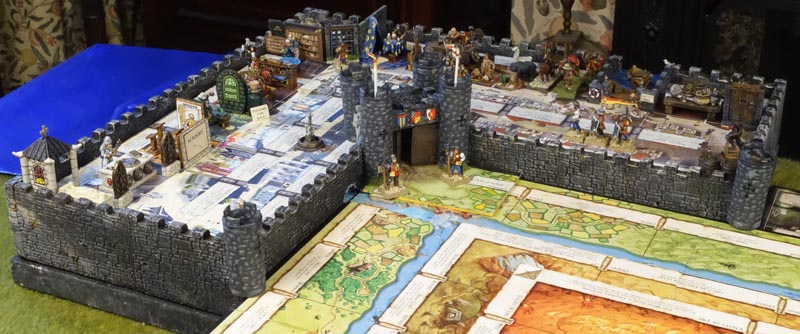
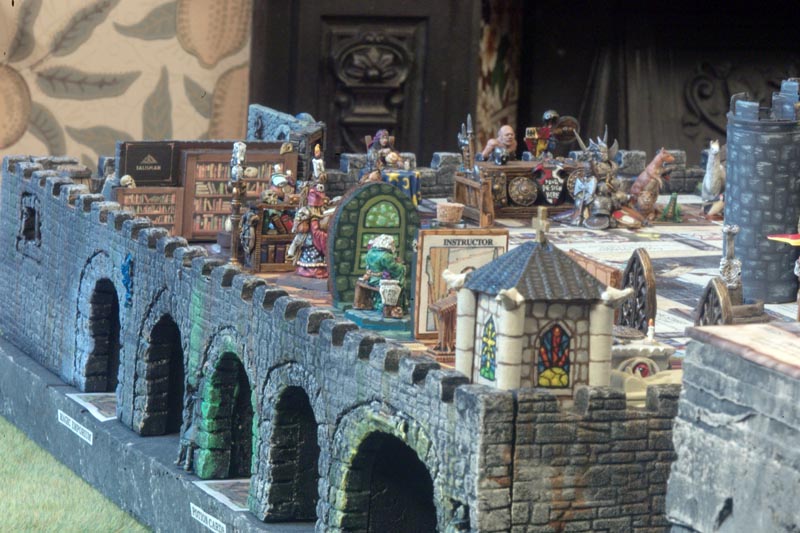
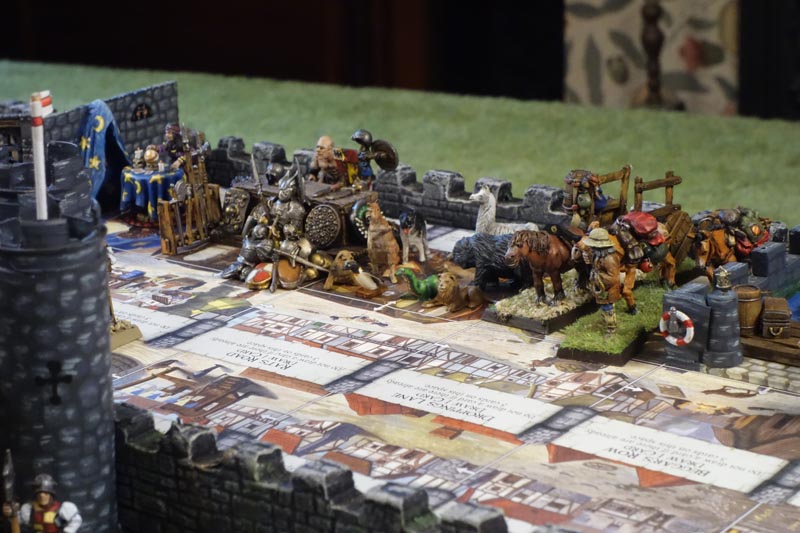
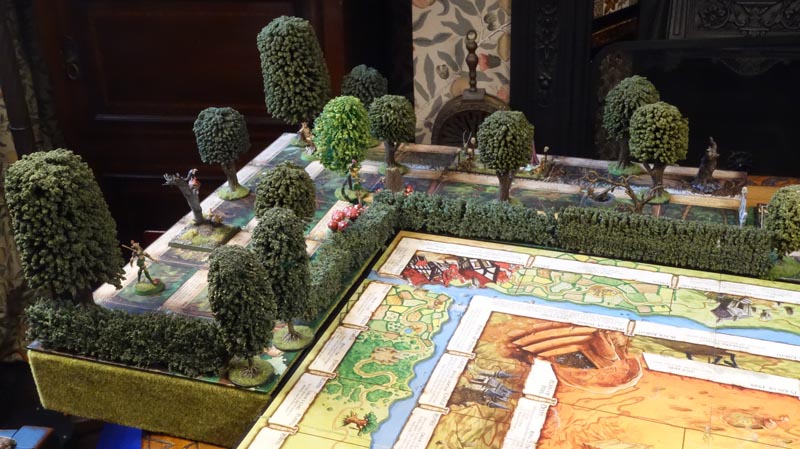
These realms were increased in size and importance with the release of Revised 4th edition. Then there were mini realms that linked the regions. You could cross from the City, through the sewers and enter the Dungeon. How cool is that? More levels to explore. I liked the artwork on the board and once again wondered about the wisdom of covering it up but then a chap called Leavon at Spare Oom Studios poured Dr. Rash Knobller’s Itching Powder™ into my ear and started producing 3D scenery that mimicked the artwork of the main board.
After buying the first few pieces I was hooked and now, with a few more bags of gold in the bank, I was able to buy and paint them all. They really are lovely pieces and the main board looks smashing with them all in place. The Crown of Command now towers over the different regions, tempting foolish adventurers, and an actual Sentinel guards the crossing of the Storm River. However, like decorating a house, once you have done one room the rest start to look shabby and the realms now looked bare and well… a bit flat.
 |
|||
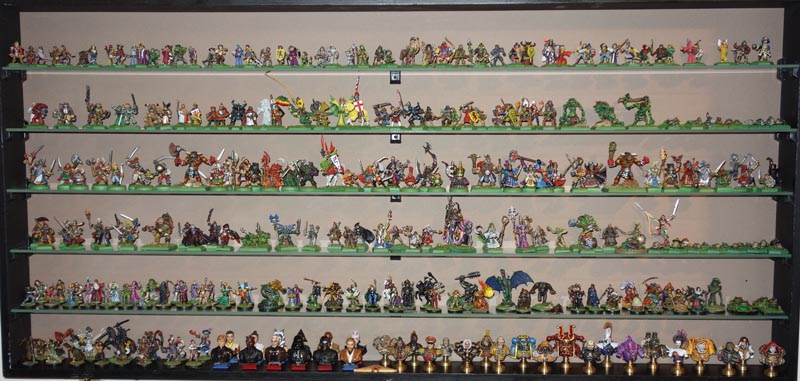
| My collection of Talisman figures from 1st edition through to Relic. | |||
 |
|||
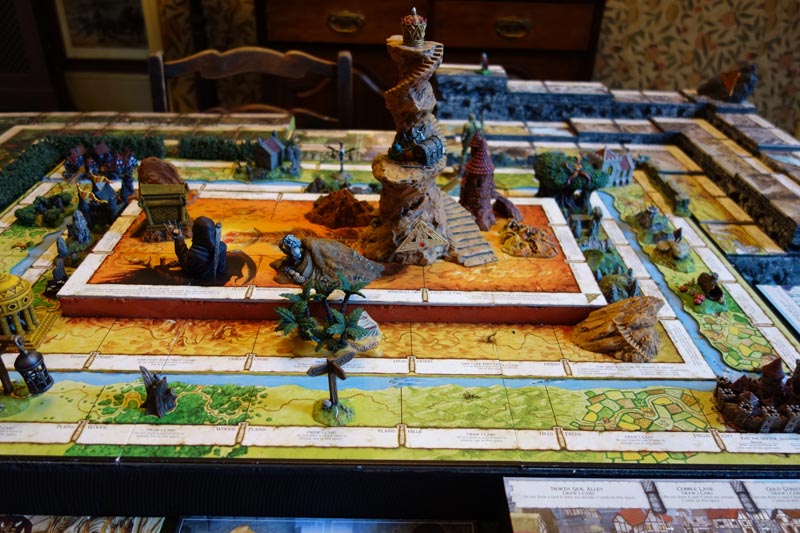
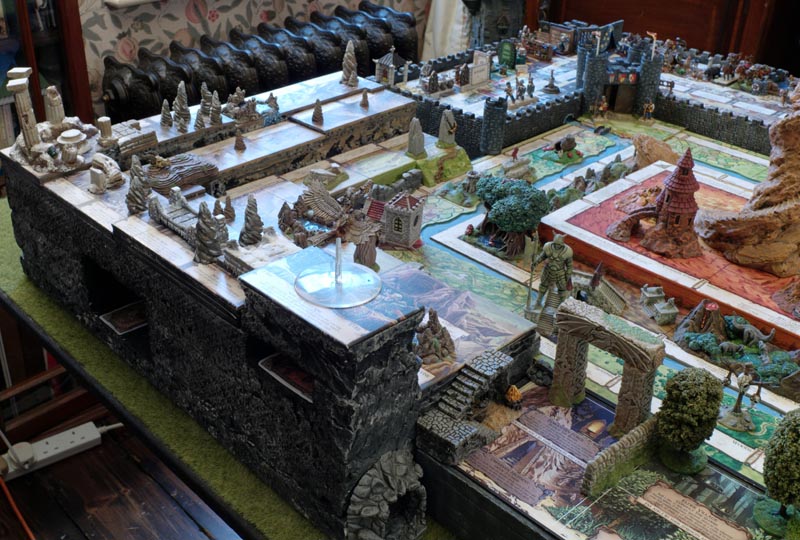
| An epic game of Revised 4th Edition with Leavon’s scenery. Initially I thought the idea of creating a 3D board would be wrong on so many different levels. |
Fast forward to 2013 and Talisman was celebrating its 30th Anniversary. Jon New, Harbour Master and creator of the wonderful on-line site Talisman Island, had gotten together with John Goodenough, Bob Harris and Gary Chalk to create a new character, The Compleat Adventurer (Look, Jon has already told you it is the correct spelling!)
As part of the celebrations, he asked people to post up pictures of their day playing Talisman. We played 1st edition in the morning and Revised 4th Edition in the afternoon and my partner made Toad in the Hole for dinner. A smashing day!
Photographs were posted up from around the world and one of them really grabbed my attention. It was a slightly grainy photo of the Fantasy Flight Games forum user Draii’s group playing Revised 4th Edition with a 3D board. Where was that knitting needle?
Still in full time employment I vowed that I would make a 3D board when I retired!
 |
|||
| My inspiration – Draii’s gathering in 2013. |
Well, time certainly flies by. With the farewell handshake a distant memory and the gold watch ticking on the mantlepiece my thoughts turned to that 3D project.
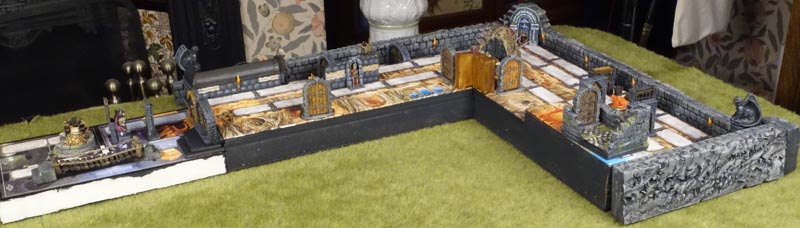
Now, there are some amazing 3D Talisman layouts out there that completely do away with the boards and use buildings and all kinds of exotic scenery to re-create the Talisman world, but I have decided not to go down that route for a number of reasons.
Firstly, I am restricted by the size of my games table in my little Victorian dining room. There is also the matter of storage when not adventuring, the loss of the instructional wording on each square and also as I said earlier, I rather like the artwork and would not want to remove it from playing experience. Sticking with the ‘L’ shape of the expansions would mean I couldn’t quite achieve the effect I wanted for, say, the Highlands, but it was a compromise I was willing to except.
I quickly realised that, like the art work, one would have to suspend belief when it came to scale for the different locations and geographical features. I devised the plan to use just one or two figures or pieces of scenery to give the feel of what an adventurer might experience when they entered that location. In order to have a nostalgia hit when we played, I would try and use figures and scenery from the 1980s and 90s though a lot would have to be scratch built to match the artwork on the board.
I would try and restrict scenery to spaces that did not require a player to draw an adventure card thus eliminating the need of constantly moving scenery though this has not always been possible. I have decided for those squares that have scenery on them and require a card to be drawn, if it is a card that remains on the space it is placed under the scenery piece. This I think then adds a fun little memory test for the player. “Hmmm… now was that the Healer under the Oasis or a Dragon?”
 |
|||
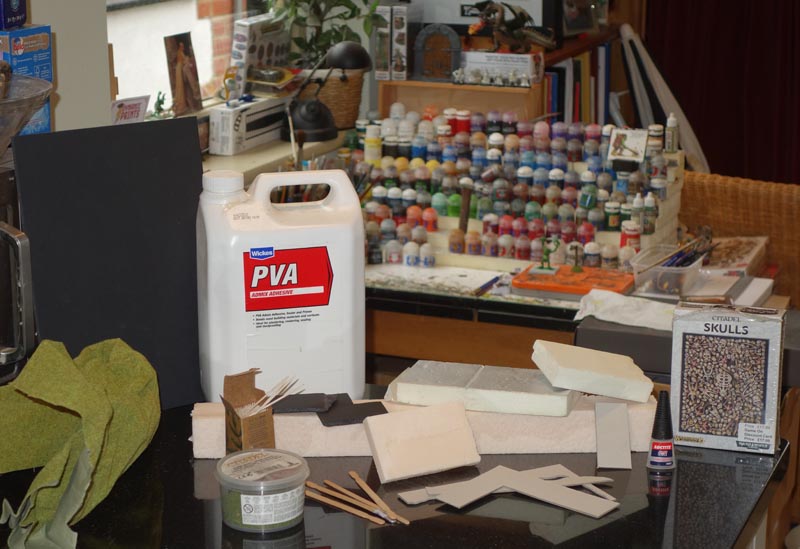
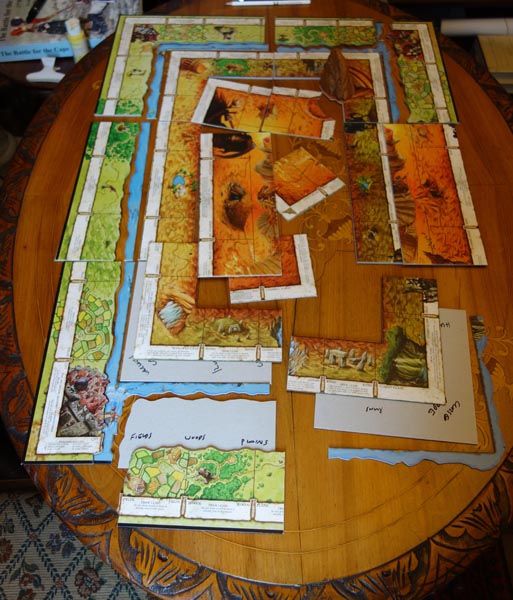
| These are the basic materials needed to create a 3D board. |
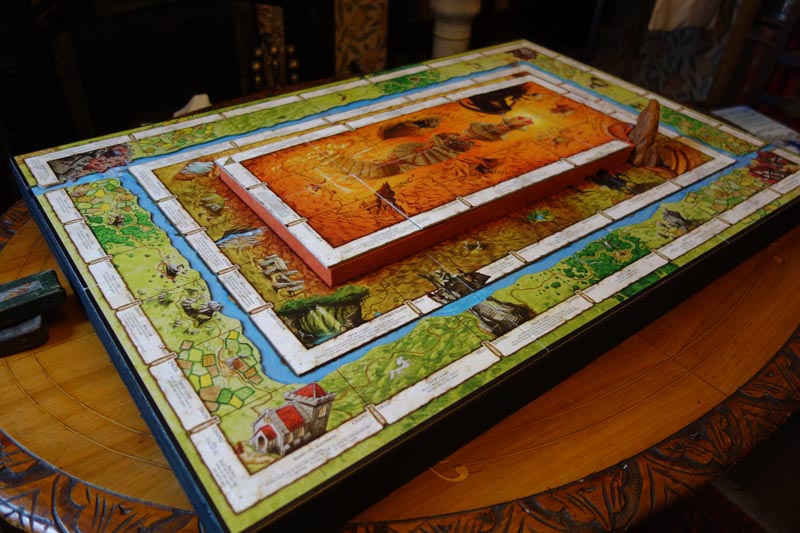
The Main Board
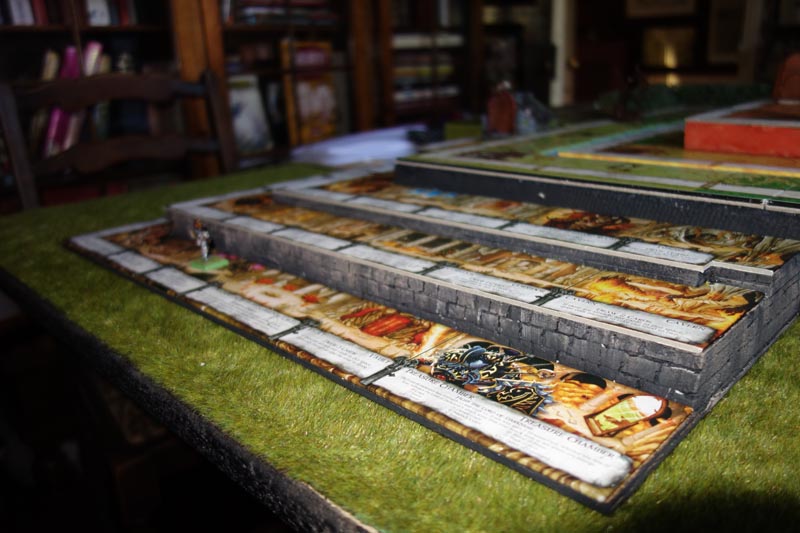
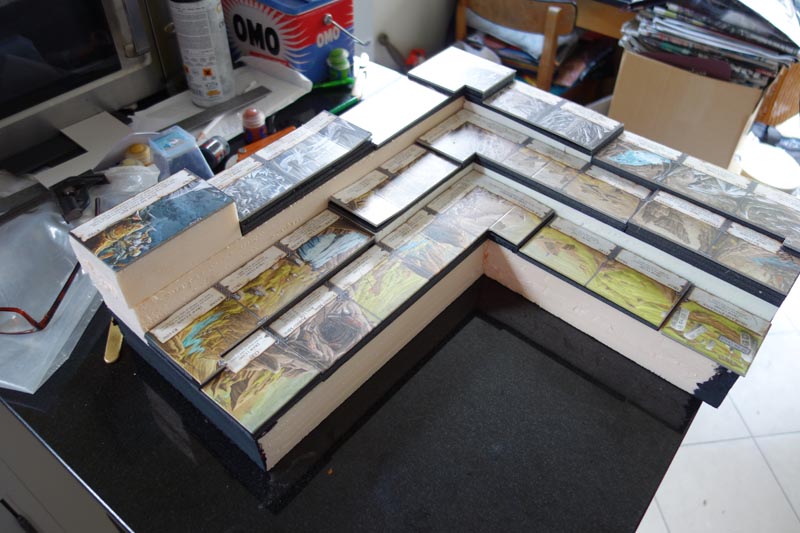
The first job was to raise up the main board so that you could experience going down in to the Dungeon. This was done by using a piece of 2” (50mm) foam insulation board.
I wanted the Storm River to be an actual physical boundary rather than just a painted wiggly line and so my partner used a fretsaw and carefully cut the river out of my spare main board. As someone who is very protective and careful with her very large Talisman collection, I had my fist in my mouth and couldn’t watch as the card dust started to fly. However, she did a really good job and with all the pieces separated they all fitted snugly back together like one of those wooden children’s jigsaws.
By raising up the land pieces with cardboard of the same thickness and cut to the same shape the whole lot was glued back together. The effect of the lower river in the landscape is subtle but you now really do need that raft or bridge to get across. The areas of artwork where the Sentinel stood and where there were bridges were painted blue to match the river. The mighty Sentinel’s bridge now spans an actual river and Leavon’s City and Village scenery have little bridges built in, so no issues with getting across there either.
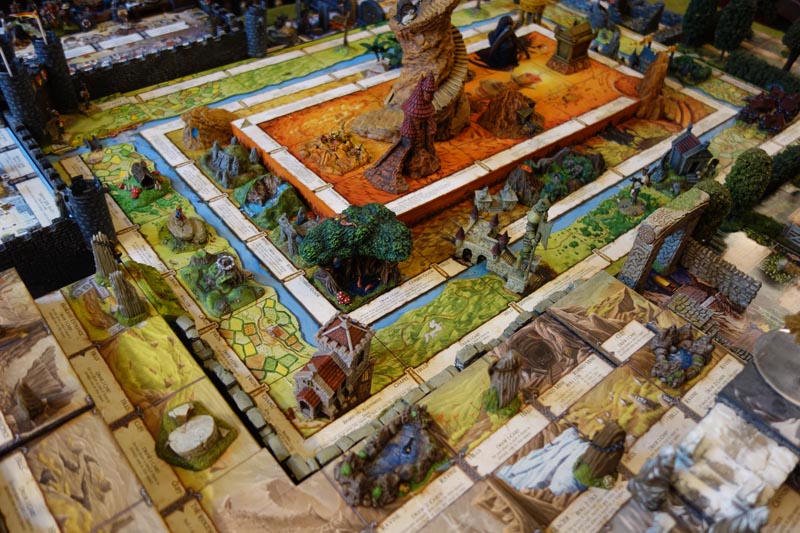
The Inner Region was raised up on a piece of 1” (25mm) insulating foam board so that you now really need those steps shown in the artwork of the Portal of Power.
 |
|||
| The main board cut into pieces. Thankfully, I managed to obtain a spare from eBay. | |||
 |
|||
| The edges of the foam boards were then painted to give it a more professional look. |
With this completed I moved onto the Outer Region. Later I would paint on mountain peaks, sand dunes and top half of the Black Knight on the edge of the Inner Region to soften the line between it and the Middle Region. ‘M’ shaped birds were painted soaring over these peaks in homage to Mr. Chalk.
The Dungeon
I managed to obtain a spare board from eBay that was damaged, but that didn’t matter as I would be cutting it up anyway. I decided on three levels and with the fret saw working overtime cut the board into sections and mounted the lowest board onto a scrap piece of hardboard from an old picture frame that was lying in the shed.
This would give it the thinness I wanted but would be rigid enough so the board could be lifted without it folding. Layers were then built up using insulating foam and foam card. The whole lot was then glued together and left overnight with heavy weights to keep it pressed down.
 |
|||
 |
|||
 |
|||
 |
The edges were then painted and using a hard pencil I scribed stone work onto the vertical edges that showed between the levels. Then using the tip of this pencil, I made indentations for each stone to give a rather pleasing dungeon wall effect. It’s worth doing this before sticking the illustrated board on to avoid getting paint on it.
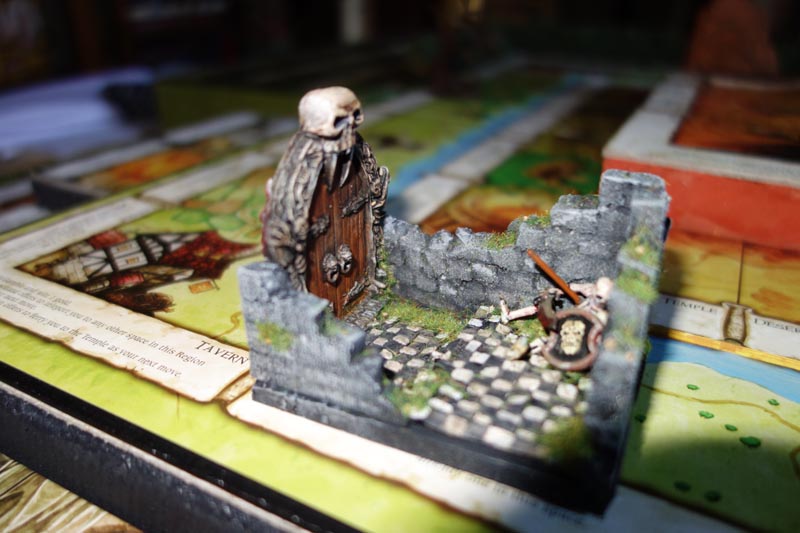
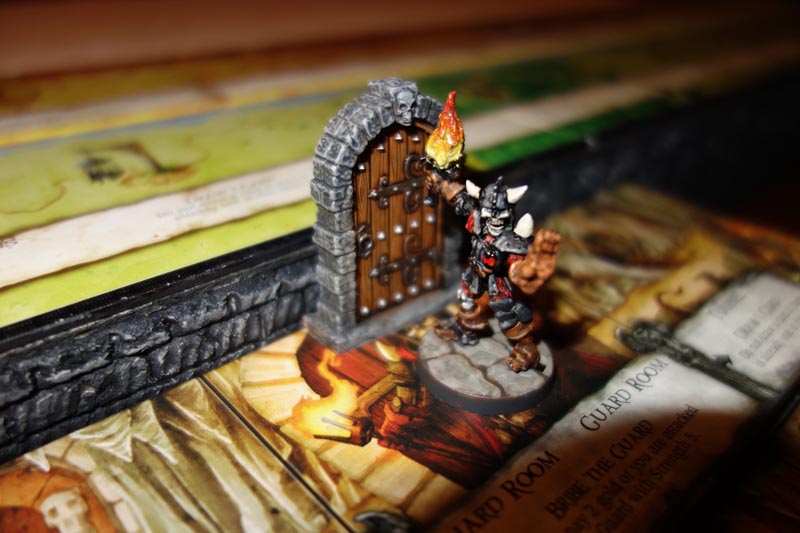
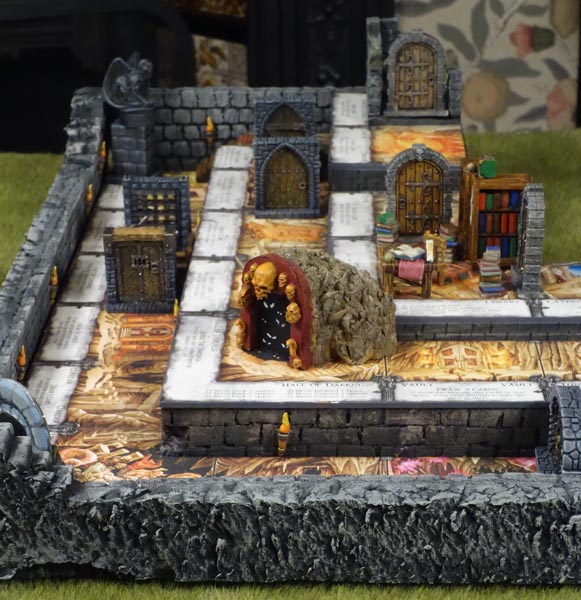
With the stone work on the vertical edges of the Dungeon completed other areas would also need attention, such as the cardboard edges of the board. The next job was those little pieces of scenery to enhance the artwork. I started with the entrance and wanted something a bit foreboding.
After all the Dungeon is not for the faint hearted. I made up a small entrance way using foamboard and stiff card. Initially the Citadel FS Demon Door was used, but I have since changed this for something a bit more 2nd edition.
Also, I had another plan for that sinister entrance. An old plastic skeleton was liberated from my spares box. His rib cage is skewered by a spear and I envisaged him as some early adventurer staggering out of the Dungeon and collapsing from his wounds with freedom but a breath away. There he lies as a warning to those foolish enough to contemplate entering the dripping, dank depths.
 |
|||
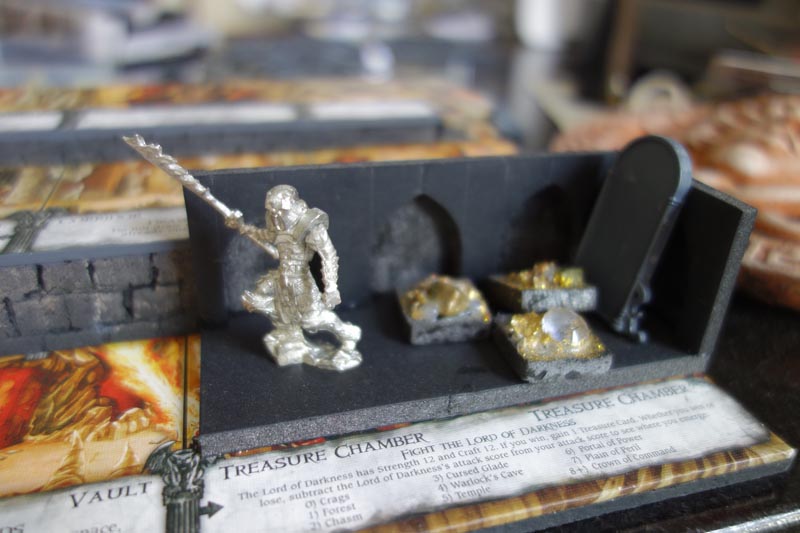 |
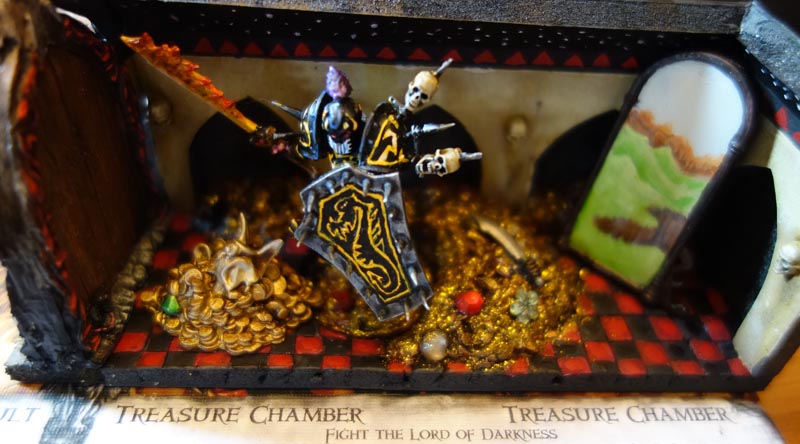
The Lord of Darkness was next to raise up out of the artwork. On the old Talisman Island, a chap called Josh Pattison had made a Dude of Darkness out of a converted Reaper miniature Murkilor the Wraith King (sounds like a Frankie Howerd character!) which I really liked so decided to try making one myself – LINK. Thankfully the miniature is still available so I set to work with files and saws.
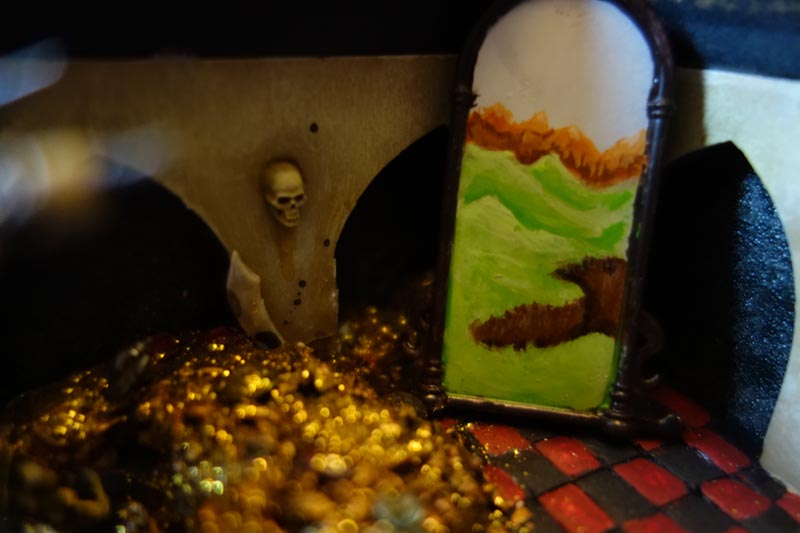
A Treasure Chamber was built out of foam board and a plastic mirror was taken from my Dungeons and Lazer scenery set. Spikey, Nurgle Chaos Space Marine shoulder pads were liberated from my spares box and covered with skulls. His head was drilled (Oooh, I bet that smarts!), a piece of wire inserted and a plume made for his helmet. His shield was made from plasticard as I didn’t have one the same shape and small holes were drilled around the edges.
I then cut some of the teeth from my anti tangle hair brush and pushed them through to form the spikes. He was then painted to match the artwork on the box. His treasure chamber was painted, adorned with skulls and loot and covered. Initially the roof came all the way over but it looked like the Dude was waiting for the Number 37 Bus so we cut it back so that it just hinted at a curved chamber.
 |
|||
 |
|||
 |
|||
| The Dude in his Dungeon. Look at all those goodies to be plundered. |
Craft shops are great for stick on jewels, gold sprinkle dust and other treasury like substances. The doorway to his chamber is the menacing metal Citadel FS3 Demon Doorway. I’m really pleased the way the paint job on the mirror came out as it really does give a sense of a portal into a land of Tralalala, skipping through the daisies, oh look a butterfly, after all that blood red spikiness.
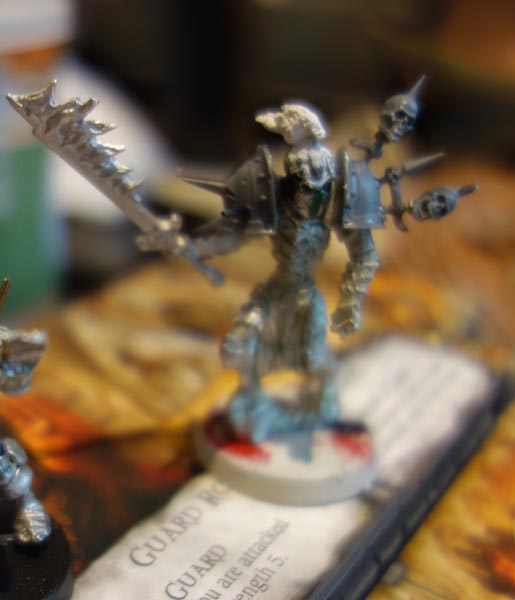
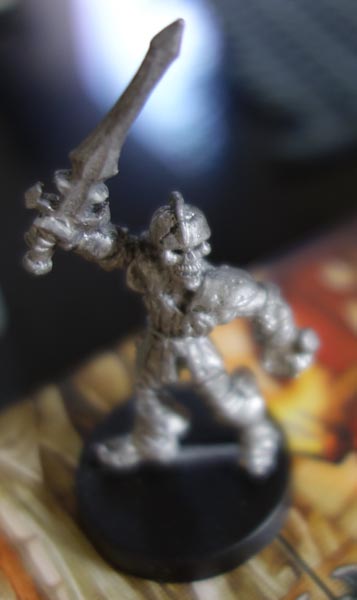
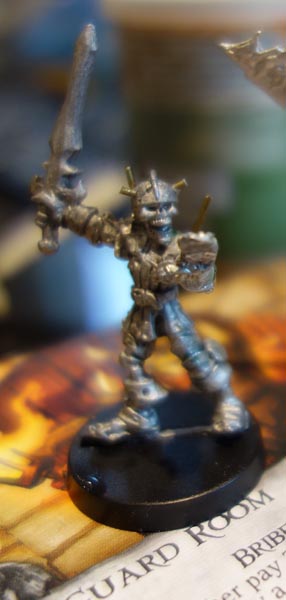
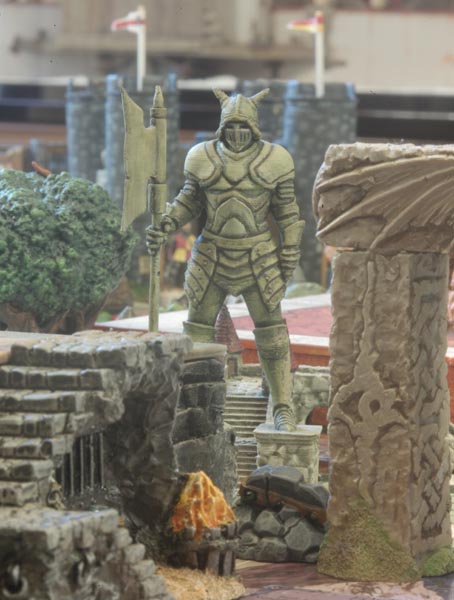
The only other ‘person’ that features on the Dungeon board is the guard and I decided to have a bash at making him. My old Citadel catalogues were po(u)red over and after they had dried out, I found the almost perfect figure to convert. The 1987 Citadel mini Duggleby the Tall, an armoured skeleton. The left hand was cut off, turned around and opened out. With the helmet adapted with horns, nose guard and cheek plates, the sword was cut off and a torch made from Milliput.
 |
 |
||
 |
|||
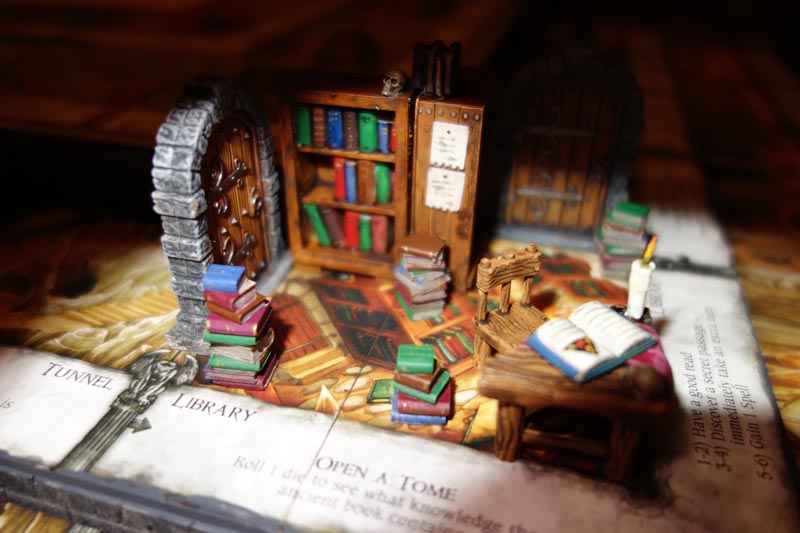
Other spaces, such as the Kitchen, Torture Chamber and Library were also designed.
The Library was made up of a bookcase set, table and chair set and two doors from eBay. The candle was scratch built from an old cotton bud. It was a bit of a bind painting all those books but the effect was worth it in the end.
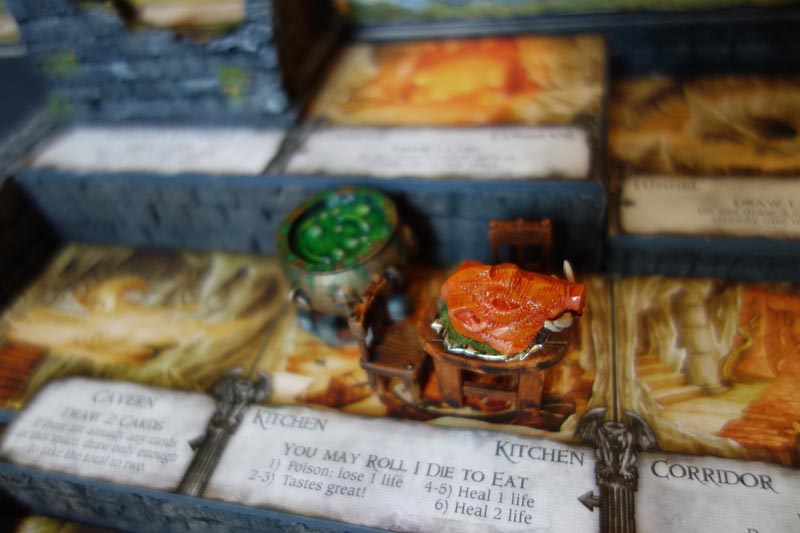
The irradiated boar’s head in the Kitchen was from my spares box and I think came from an orc boar rider.
Metal torches, kitchen and torture chamber doors are from Scotia Grendel. Library doors from eBay. The Hall of Darkness was scratch built using old foam and GW skull set. The outer walls of the Dungeon were mounted on thin card that slips under the board and holds them in place.
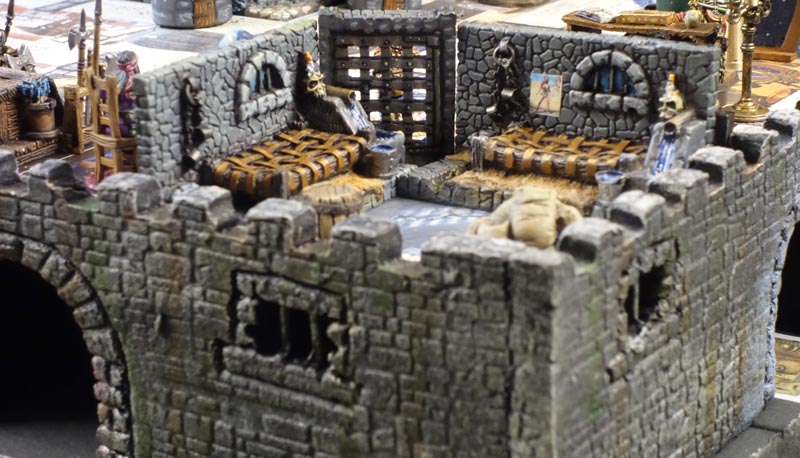
The Cells were scratch built using foam card, wire and bits of an old metal Citadel skeleton that was ‘liberated’ from one of my orc banners and used for the dead guard. The altar in the Summoning Room and two menacing gargoyles are from the Scotia Grendel 10063 Demonic Altar and Pillars set. They are not stuck to the columns. One has painted red eyes the others are blank meaning I can swap them about. “Was that statue looking at me or not? Errrr… oooh I think I’ve left my straighteners on. Hang on back in a tick!”
 |
|||
 |
|||
 |
|||
| Have a bite to eat and then stretch out in comfort in the Torture Chamber. | |||
 |
|||
 |
|||
 |
|||
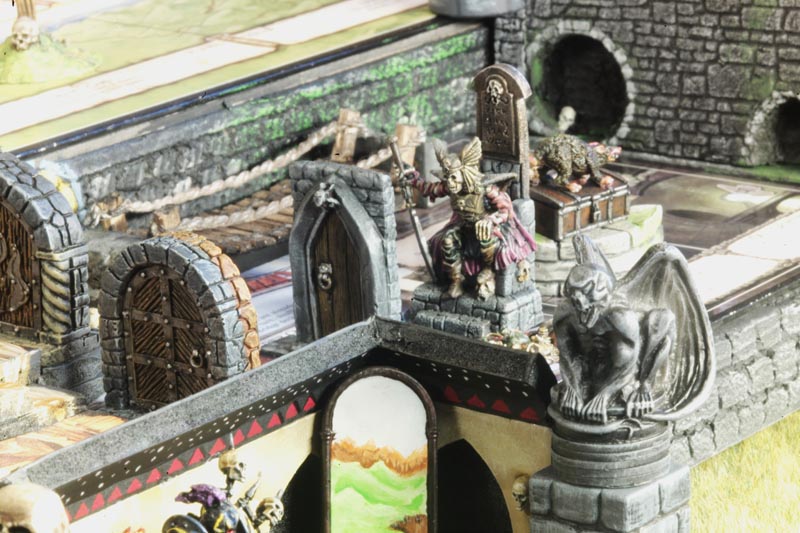
| The finished Dungeon. The Citadel FS2 Magic Mouth Doorway and skeleton guard in his alcove reminds me of a piece of Gary Chalk artwork from the Lone Wolf series. |
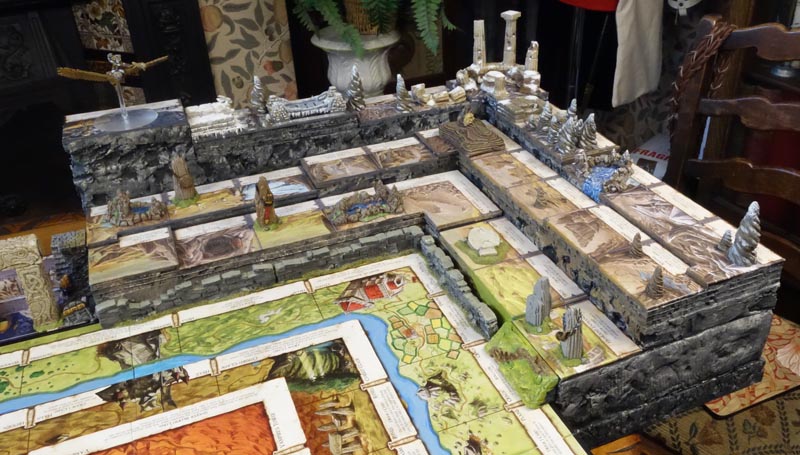
The Highland
 |
The Highland now rose to the top of my list of things to do but I didn’t want to peak too early. Its building was just a reversal of the Dungeon though I had to sacrifice my own board to do it.
Layers were formed to give a sense of climbing, though I quickly realised I would be limited to how mountain like it looked by using the original board. The edges were painted before sticking down the board pieces and scenery was added to give a sense of rockiness. I love Scotia Grendel’s scenery as most of it is from the old Fantasy Forge range from the early 90s. There range can be seen HERE, though beware as like one of those High Street Pound Shops, you’ll end up buying a lot more than you intended. Though a lot of it is too big for the Talisman board spaces, some of it is just right and I used a lot of it in the Highlands.
10012 Dais, 10042 Burial Mound, 10099 Sundered Temple, 10100 Ruined Pillars, 10104 Rock Pools, 10136 Stalagmites (cut from their bases) and the Rope Bridge from F0009 Subterranean Cavern Set.
 |
|||
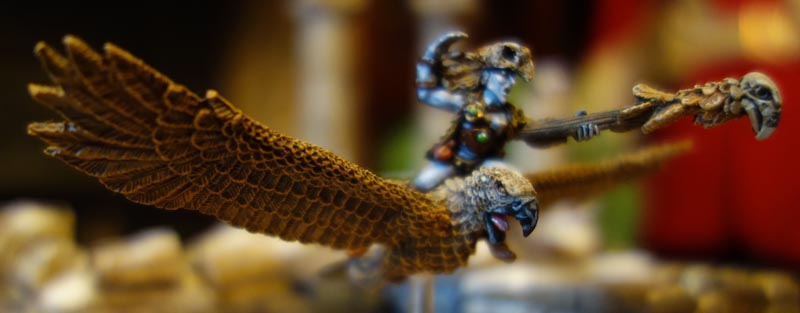 |
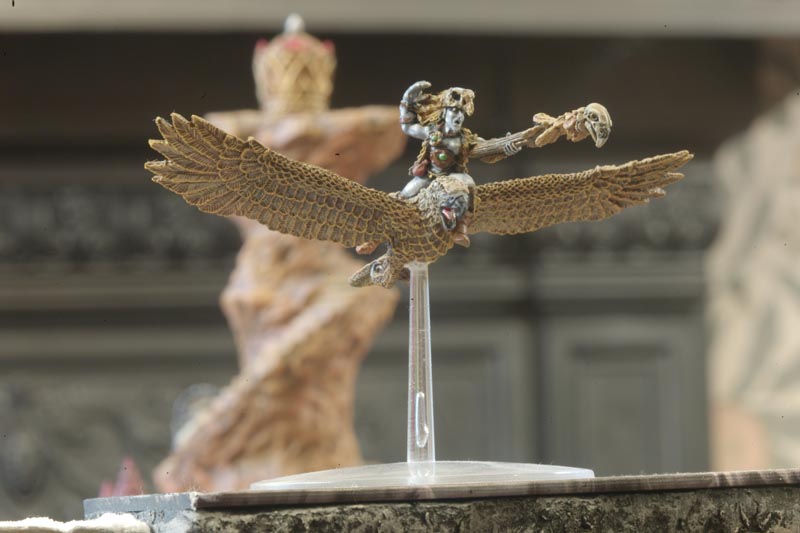
With the Dude of Darkness (I must stop calling him that) ruling down below it only seemed right to have the Eagle King soaring up above. This was a much easier conversion using a Wood Elf Warhawk Mage rider. Prices of these are soaring at the moment but I managed to snare one going cheep still in its blister and after making a Milliput bird skull helmet he was pretty much ready to flap. He’s a good size too for the board and I like the fact the weapon he is wielding is the same as that strapped to the back of the rider in the artwork. Bearing in mind where he lives, he’s quite an eerie character and I’ve often wondered if the Eagle King is related to Rogue Trooper?
The ramp into the Highlands is just a piece of foam painted to look like a track and the wall sections are late 90s Citadel.
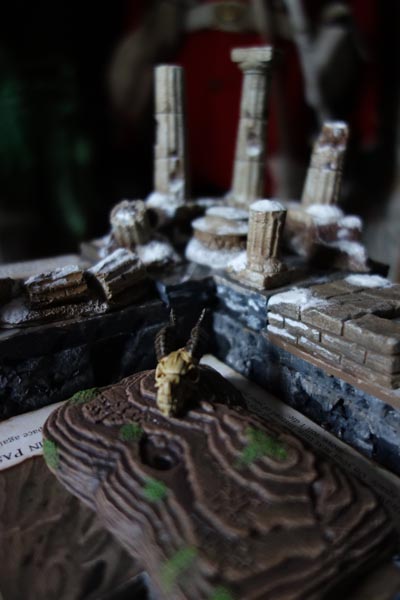
The moan of the wind blowing through these abandoned columns of the Lost City could just be a natural phenomenon, or is it the lost souls of those who have gone before warning you to turn back before it’s too late.
 |
|||
| I feel chilly just looking at this. |
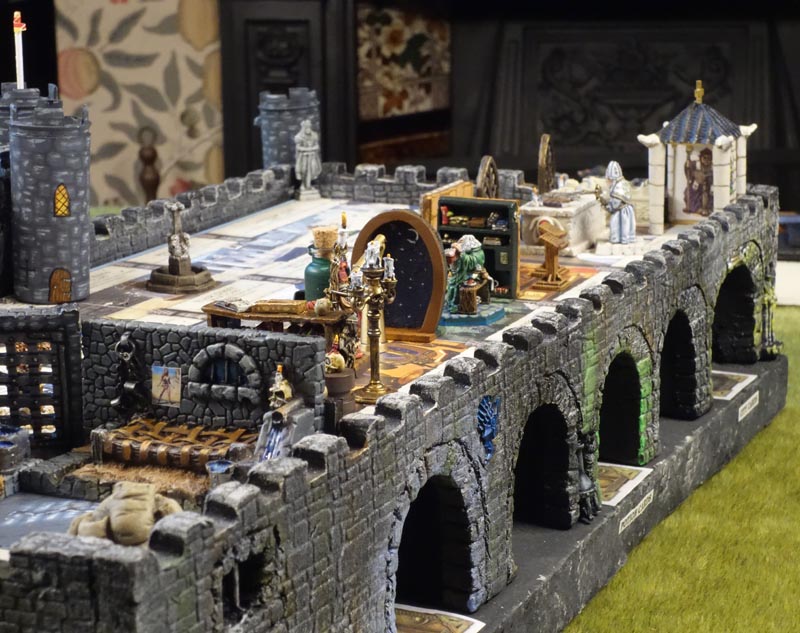
The City
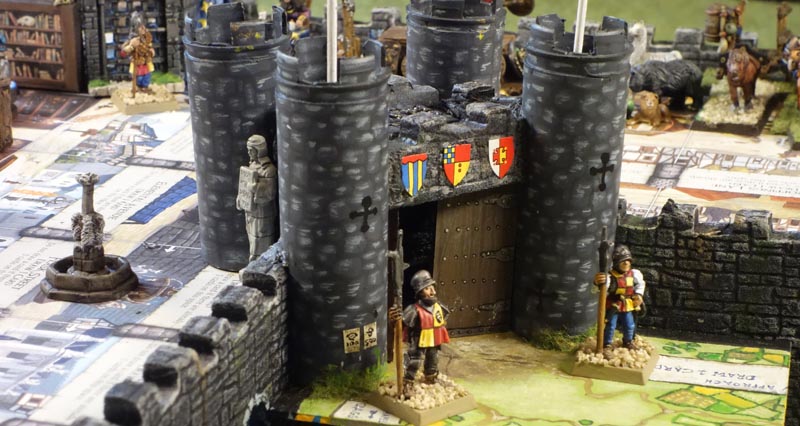
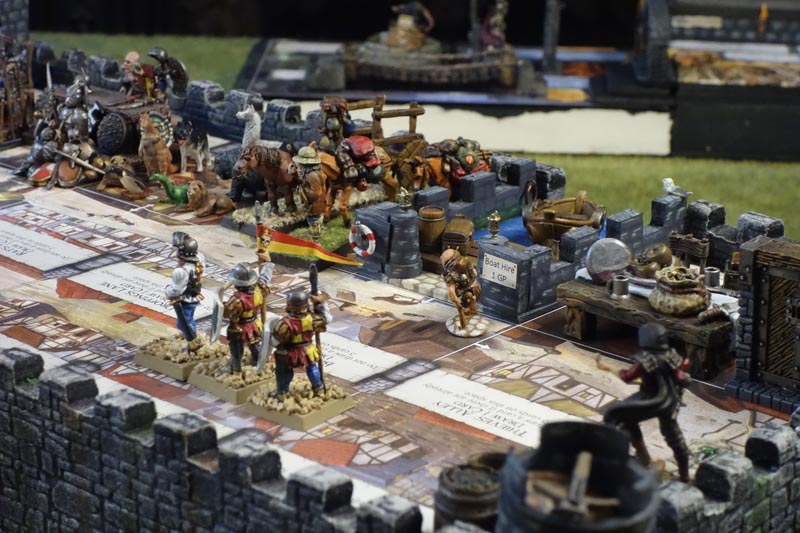
In contrast to the other regions, I wanted the City to be a busy looking region with bustling streets filled with a myriad of different characters. It also had to be fortified (like the one in Draii’s picture) to protect its citizens from the dangers that lurk in the Outer Region but could find no off the shelf wall sections that were the right size. So, something would have to made. There is a chap by the name of johnm9327 who sells fantasy scenery made from foam board on eBay – LINK – and having had items from him before and being impressed with his work, I asked him to make me the City foundation with walls and gate.
As he is a keen gamer and has the Revise 4th Edition of Talisman on his own shelves he was able to look at the sizes and make something to fit. On the whole I was impressed with the result, though the gate house was not what I had in mind and the board was a little high within the walls. Also, when laid alongside the main board the walls were too low so I raised up the whole region with an additional L shaped piece of foam.
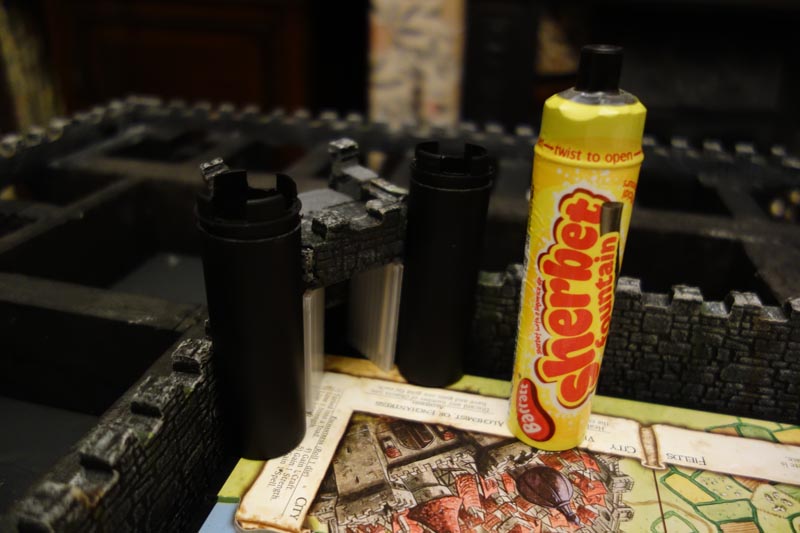
2022 was the 100-year Anniversary of the Sherbet Fountain and I had a couple of these in the pantry. Looking at the tubes one day I offered them up to the City gates and though “Hmm they would make good towers.” I would need six so, after overdosing on white powder and coming down off the ceiling, I set to work with a rather shaky, sharp knife.
The black tops normally used to hold the liquorice stick were turned upside down and stuck in the top and crenelations were cut into them. I then painted a stone effect on each of them and made some gates out of plasticard. The inner towers had to be shorter as the board was higher and could not be fixed in place as they have to be removed to lift the board out. Circular discs of card were painted to look like floorboards and put in the top and flags made from cocktail sticks. Finishing this part of the project in a record time I had at the end of it a City Gate worthy of this grand region (and no teeth).
 |
|||
| The Gate design means you can dip into the City whenever you like. | |||
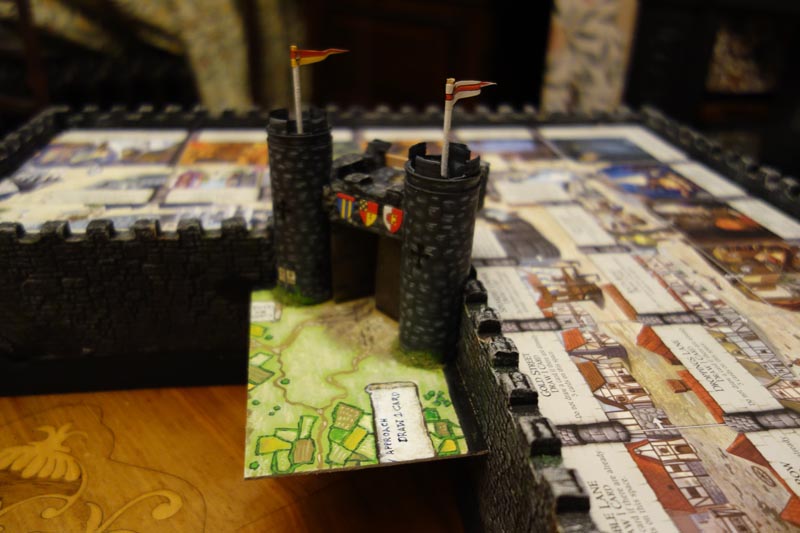 |
To support the towers and make the whole structure more rigid I cut slots into the walls and fitted a base, gluing the towers onto it. This was then colour matched with the adjoining squares. I painted a small banner on the base that reads “Draw a Card” to make the square useful and encourage players to go into the City to buy stuff. Note the Wanted Posters.
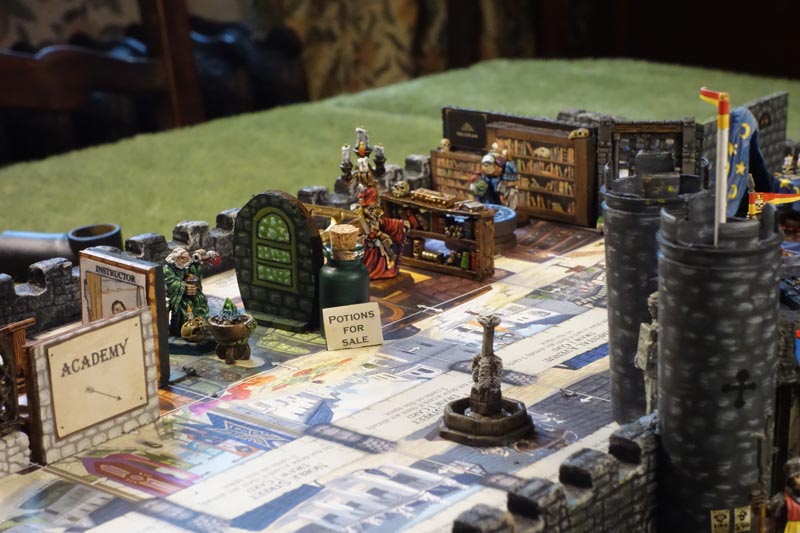
I had to adapt the City by photocopying the original City Square and then cutting out the banners for the Doctor, Alchemist and Enchantress. I then put the doctor in the Temple, the Alchemist with the Apothecary and the Enchantress in with the Soothsayer so you have two options when visiting each of these locations. I think they fit rather well as monks were healers in the Middle Ages, the figure I used for the Apothecary is actually an Alchemist and the Enchantress looks the same as the Soothsayer. Their instructions were stuck onto the City Walls as in the photograph
One downside of this approach is that it means you can no longer use Leavon’s wonderful City terrain piece. Without it’s built in bridge there is no way to cross the Storm River. An arched metal bridge from the Mighty Empires range is a good replacement. Access onto the battlements is through Citadel’s FS4 (v2) Trapdoor.
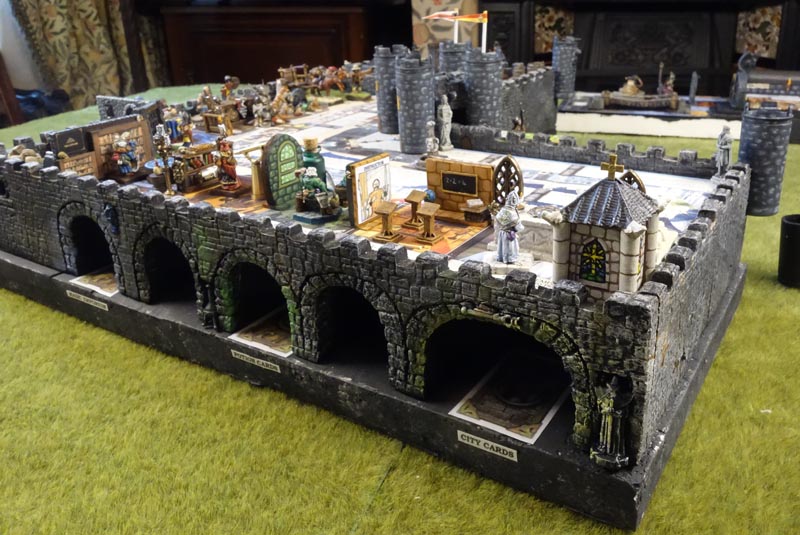
Now to turn a deserted ghost town in to a bustling city. This is where I would get my nostalgia hit and make up for those lost 1980s years. I decided to populate the city using Oldhammer miniatures and scenery that I missed out on back in the day. And here are the city inhabitants:
1/ Temple – Scotia Grendel Altar from F0046 Temple of Set …set. Two FS13 Magic Windows from the Citadel Fantasy Specials range. Knight’s Coffin from Dungeons and Lazers set. Citadel Bishop from C46 Townsfolk and Villagers range. The Temple Tower is made from a broken old budgies mirror that I’ve had kicking around since I was little which I kept as it ‘might be useful one day.’ Religious icons created using the 2nd edition Priest and Monk artwork adorn the inner walls giving a nice continuity with the past. I wasn’t sure to begin with about using an old mirror as a tower but on reflection it worked out rather well.
2/ Academy – Scratch built outer wall that doubles as the chalk board. The Metal Lectern set from Scotia Grendel also comes with little globes and skulls with candles on that are used elsewhere. The back of the Apothecary’s bookcase has more 2nd edition artwork informing you who your ‘Instructor of the day’ is.
3/ Apothecary – Alchemist miniature C46 Townsfolk and Villagers range. The metal ‘blazing cauldron’ and wizards’ bookcase I believe are early Citadel, but neither are shown in the FS range. The window is painted onto foam card that doubles as the Sorcerer’s sky gazing window.
4/ Sorcerer – The Great Waldo from Citadel’s 1985 CO2 Wizards range. Scratch built telescope made from brass. Sorcerer’s bookcase is another early Citadel looking piece but not in the official range. Plastic candlestick from Dungeons and Lazers range.
5/ Magic Emporium – Banacheck Bowback from Citadel’s 1987 CO2 wizards’ range. Scratch built table. His bookcases are scanned copies of those from Heroquest and then using foam card to give some relief stuck on to the back of the Jail walls. Plastic skulls from Citadels new skull box set were used here and throughout the other regions.
6/ The Jail was made from two identical pieces from the Scotia Grendal F0043 Dungeon Set. A door that matches the artwork also comes from this set. The Rachel Welch poster on the wall is my nod to the film The Shawshank Redemption.
7/ Soothsayer – There is nothing really suitable in the old ranges for this so I used the Fortune Teller Wizard Sorcerer from Dynamic Prints’ Galaad Miniatures. She is a perfect match for the artwork and I made part of her location, the star-spangled marquee, from Milliput and tuck it on to the wall of the jail. Working on this square was intense. I painted her with a smiley face in case for some reason during the game I had to attack her as when playing board games, I always like to try and strike a happy medium.
8/ Armoury – 1987 C46 Villager Blacksmith standing behind the counter from the Scotia Grendel 10047 Armourers Workshop. The rack of weapons and pile of armour came from eBay.
9/ Menagerie – I found a box of plastic animals of various shapes and sizes in a charity shop. Most of these are from the Airfix Zoo set from the 1970s.
10/ Stables – I have always wanted Citadel’s Adventurers’ Cart Set and the lovely mules they created. The cart is the C22 Adventurers Cart with Trigger the pony. The waggoneer who comes with the set makes a nice stable owner. The Mules are FS29 (v1) and FS29 (V2) from the Fantasy Specials range. They have always reminded me of the mules in the Gary Chalk artwork in 1st/2nd edition. The cart and mules are now rare and not cheap nowadays. I ended up blowing my Christmas money on these three.
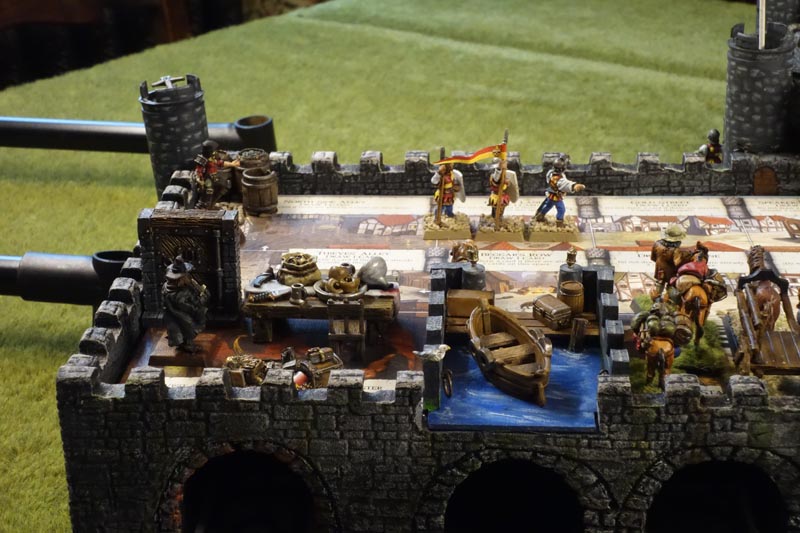
11/ Scratch built Wharf using foam card, matchsticks and wooden MacDonalds’ tea stirrers. (Other fast-food restaurants are available) The boat is from my spares box and I think came from an old Kinder Surprise and the seagull is made from Milliput. The luggage is from Esci’s 1/72 scale plastic fortifications set. The original piece of City wall had to be cut away to allow access for the fleet of boats that supply the inhabitants with exotic wares from far off lands and new pieces were cut out of foam card to make the harbour walls.
12/ Rogues’ Guild – Citadel slotta Rogue. Table and metal pile of treasure from my spares box. Not sure where they came from. Door that hides this sinister guild activities from the prying eyes of the Watch is Scotia Grendel.
The two entrances to the Deep Realms sewer and rope bridge are Citadel’s FS13 Trap Door and Floor Grill Set.
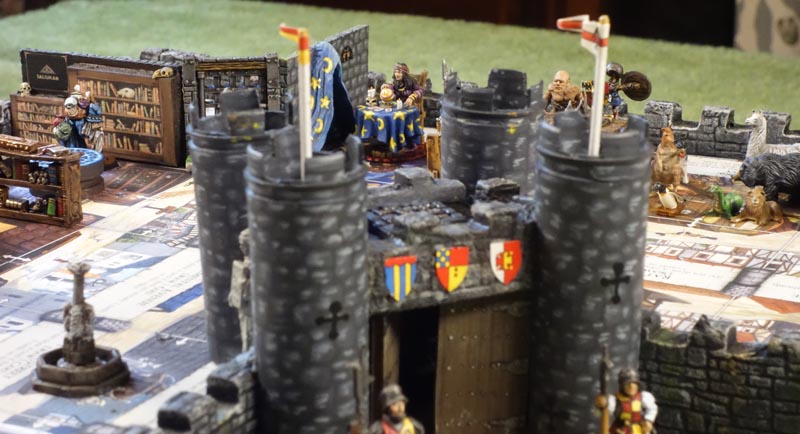
When putting together the City Watch I had the image in my head of Gary Chalk’s artwork from the Patrol card from 2nd Edition. There are six Citadel miniatures in my Watch from various Empire and Bretonian ranges. There uniforms are red and yellow to match the banner colours on the entrance to the City in 3rd Edition. A Fruit Salad militia to guard my Sherbet Fountains. Talking of fountains, I splashed out on the Citadel FS 31 Magic Fountain for the fountain square by the gate.
 |
|||
| The finished City. | |||
 |
|||
| At the gate house where the City Watch keep an eye on who enters and are quick to eject riff raff. |
The additional towers were made the same way on each corner. The rear towers of the gatehouse are not permanently fixed but are held in place with cocktail sticks shoved through the foam which allows them to be removed in order to lift out the board. Note the culvert allowing the Storm River to run under the City.
A really nice touch that John built into the base of the City were little alcoves for shop keepers to store their wares. He made a really nice job of the City Walls and there are spare alcoves to put the City cards and spare Wanted Posters. I really recommend his work.
Now we are inside let’s take a wander around the City and meet some of its inhabitants –
 |
|||
 |
|||
| Wandering along the City Streets past gaily fluttering banners and gurgling fountains in the posh end of town. | |||
 |
|||
| The view back up the High Street. | |||
 |
|||
| Services are BCP at 08.00 and Full Communion at 10.00. | |||
 |
|||
| Potions, Spells and magical artifacts are all for sale for the adventurer with gold to burn. | |||
 |
|||
| Break the law and you’re in the slammer. But is that an escape tunnel behind the lovely Raquel? | |||
 |
Beyond the Jail the neighbourhood starts to go downhill. Here you will find more common wares useful for your adventure, or you will end up with your throat cut. It’s a seedy part of town so be careful. Note the Soothsayer being watched by some forgotten prisoner.
 |
|||
| After buying your armour and killer white rabbit you can bung it all on a shiny new zero mileage mule. I love the City. | |||
 |
|||
| The not so posh end. |
The vigilant City Watch on Patrol but even they try to avoid this part of the neighbourhood, only going in when they are called. Note the rogue skulking behind the door, dagger drawn. Buy what you need and leave quickly via the Wharf (making sure you don’t get pooped on by the seagull as its not pleasant removing the runny remains of discarded fish and chips from your new Plate Mail!)
Female thief from Dynamic Prints’ Galaad Miniatures is a little tall next to the old Citadel figures but I spotted her when looking for the Soothsayer and just loved the mini. Holding a sinister curved dagger and a stolen gold coin, is she a member of the Thieves Guild, Assassins Guild …or both?
 |
|||
 |
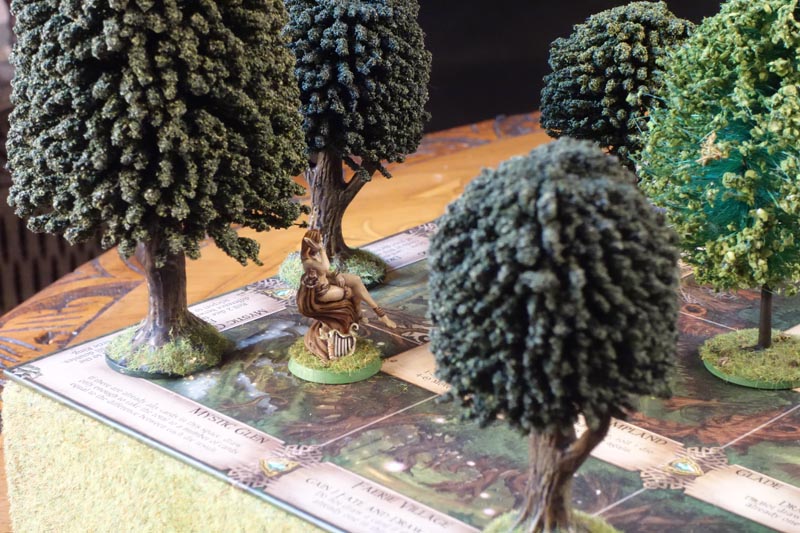
The Woodland
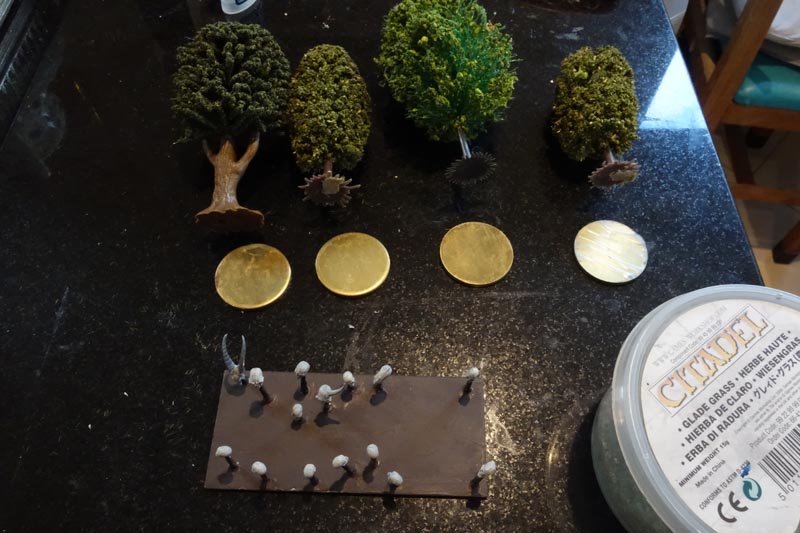
The Woodland expansion was the easiest to do. An ‘L’ shaped piece of foam was cut and covered in grass matting to match my games table. Trees, I think from Hornby or Games Workshop, were too top heavy and kept falling over so they were affixed to metal bases. Fae miniatures were bought from Dynamic Prints’ Galaad Miniatures to dot around the woods and the 10019 Fungi set used from Scotia Grendel. The two pieces in this set are quite large and don’t leave mushroom to put anything else on the square.
With the Woodland in place, we now have a problem with the course of the Storm River. One of my hedges had sustained some damage to its lower edge over the years and I used this one for the hedge line that faced the river. An arched stone drainage culvert was made out of foam board and old wire (think Helm’s Deep) and was mounted on a piece of card. A sink hole was painted on the Woodland side allowing the water to run away. It must still run near the surface though, evidenced by the amount of boggy and swampy ground in the Woodland that can quickly bring a heavily laden cart or mule train to a grinding halt.
 |
|||
| Mounting the trees on metal bases makes them more stable, plus Mab’s Lair under construction. | |||
 |
|||
| The Woodland in place. |
The Citadel hedges give a pleasant break with the main board. An old WW1 Britain’s tree is used for the Witch Tree and a scratch-built trunk on a 40mm base for the Blasted Heath.
The Dynamic Prints’ Galaad Miniatures are 3D printed and though lacking the heft of a good old fashioned metal mini have a lot of very fine detail. Care needs to be taken when painting as this detail is quickly obscured if paint is too thick.
Once painted the fae miniatures are dotted round the Woodland. It’s their realm after all!
 |
|||
 |
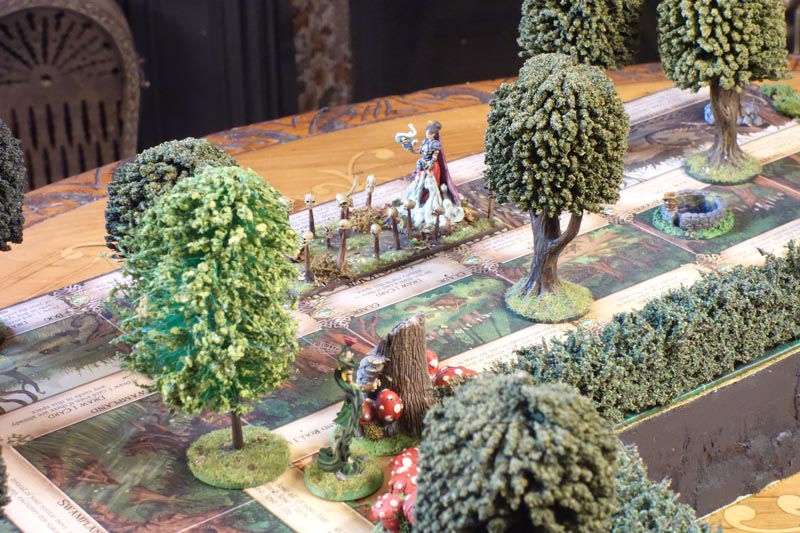
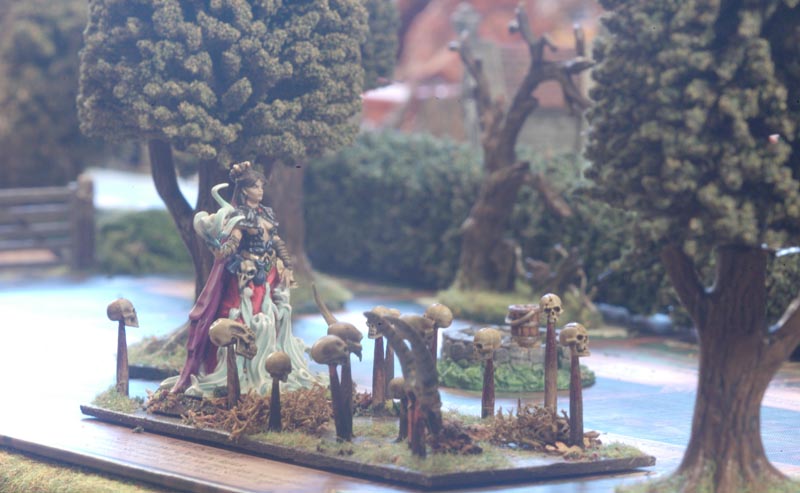
The Dungeon and Highlands both have nasty dudes at the end and I wanted something for the Woodland but ‘Meeting With Destiny’ didn’t really give much scope for a figure so I thought I would jazz up the Mab’s Lair square with the evil lady herself.
The base is a piece of card with cocktail sticks shoved through and Citadel skulls skewered on the top. The figure is Dynamic Prints’ Galaad Miniatures Sorceress which, with those tortured souls rising up from the depths, I think looks smashing.
 |
The Lost Realms
I really like these little mini realms and wanted to make them blend with the other boards by providing access to them.
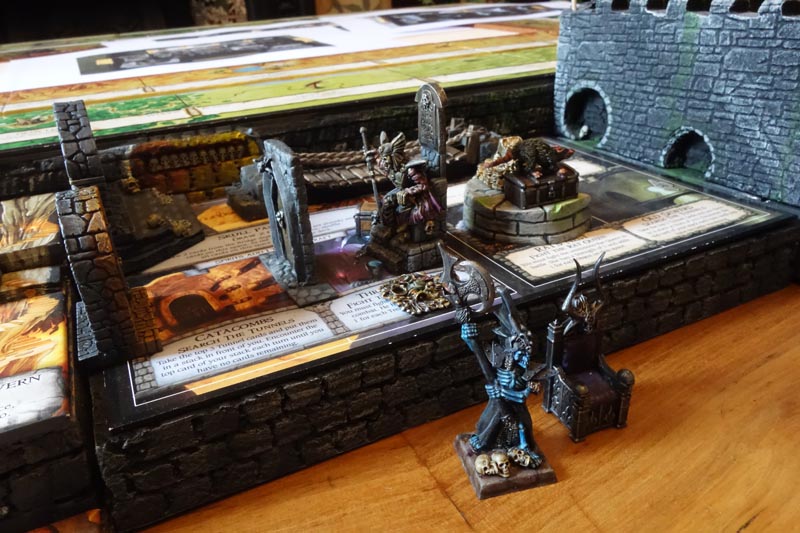
The steps are from Scotia Grendel’s F0043 Dungeon Set and by a happy coincidence were just the right size to drop down from the Highlands into the Dwarven realms. Access back on to the main board is through another Scotia Grendel piece, the Dwarvish looking 10018 Standing Stones. The Scotia Grendel Cave Mouth is a bit of table candy and hints at a possible series of Catacombs beneath the Mountains.
 |
|||
 |
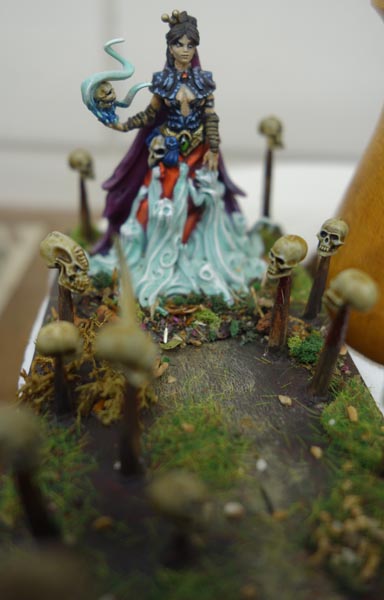
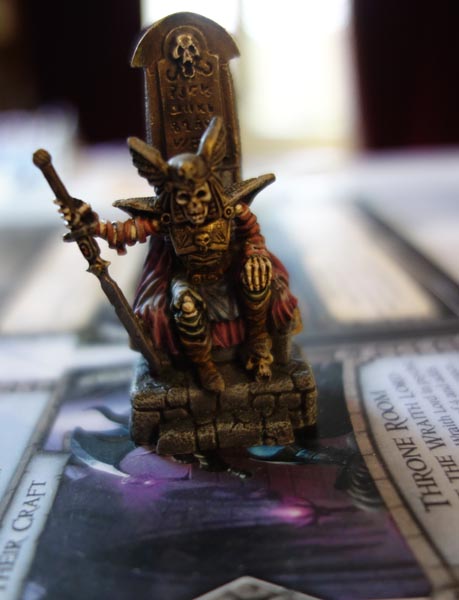
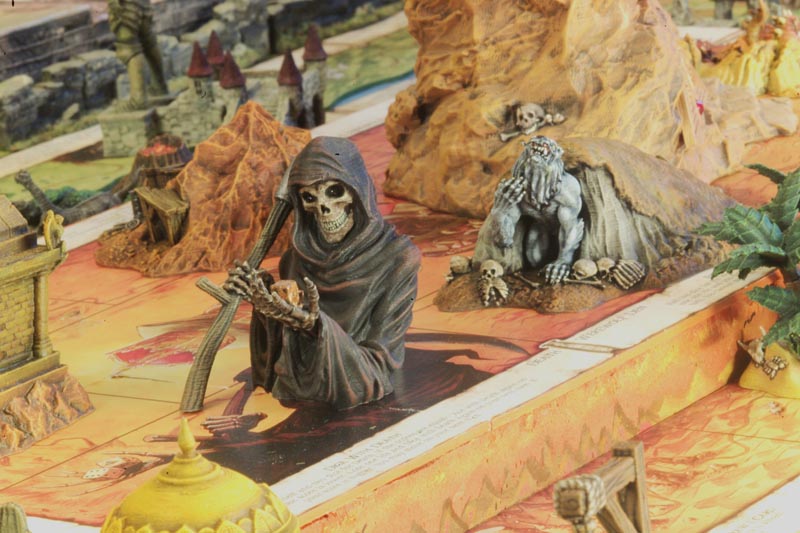
Access into the sewers was achieved by cutting holes into the side of the City wall. Access into the skull passage and catacombs is through Scotia Grendel’s 10095 and 10096 Door Sets. If you are brave enough to enter the Wraith King’s Throne Room you have to push open the Citadel FS1 Dungeon Doorway. Initially the Throne room was made up of the throne from the Dungeons and Lazers set with a horned skull glued on top and the Wraith King is Citadel’s 1995 Undead Tomb Guardian who sort of matches the artwork with his big chopper. I was happy with this set up until I found Reaper miniatures Dark Heaven Legends 02056 Dragoth the Defiler Lich sitting, Crom-like, on his throne. I just had to have him. Now I have a choice. I’ll let you decide which is best.
The Rat Queen is a giant rat from, I think AD&D, sitting on a chest on a 10012 Raised Dais (Scotia Grendel). The rope bridge is scratch built using err… rope and wood. For the skull passage a small channel was cut in the side of the main board and ten skulls from Citadel’s boxed set were mounted on a cocktail stick and stuck inside. The steps down were made from foam board.
 |
|||
 |
|||
| CROM! |
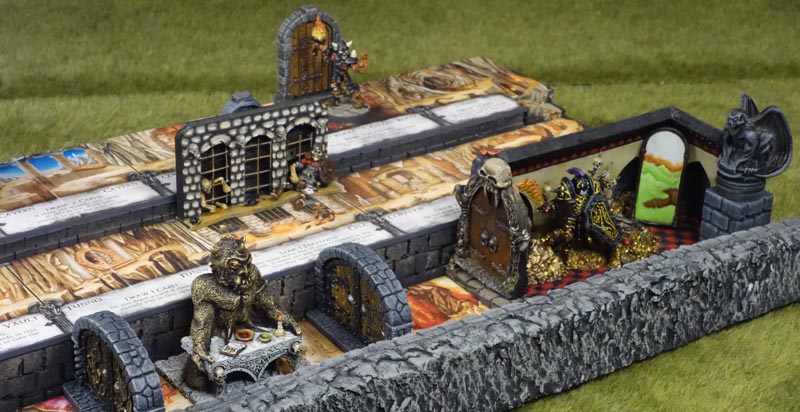
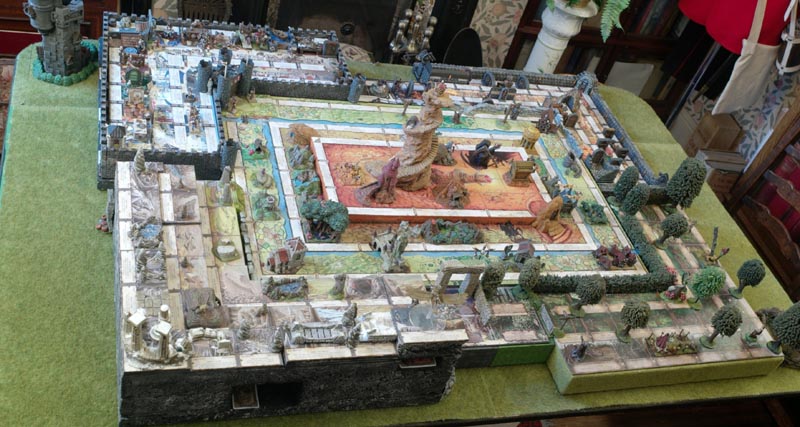
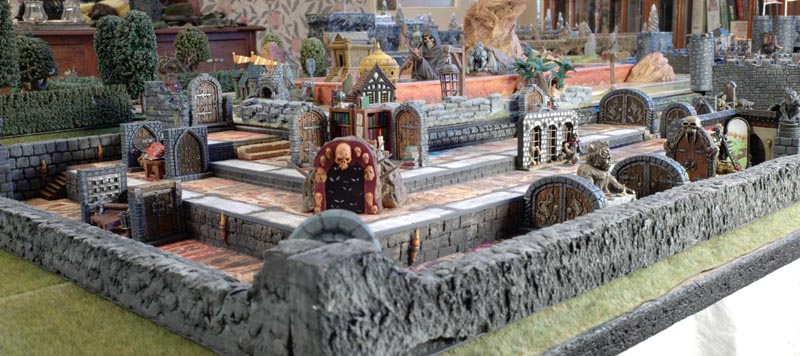
The Completed Realms of Talisman
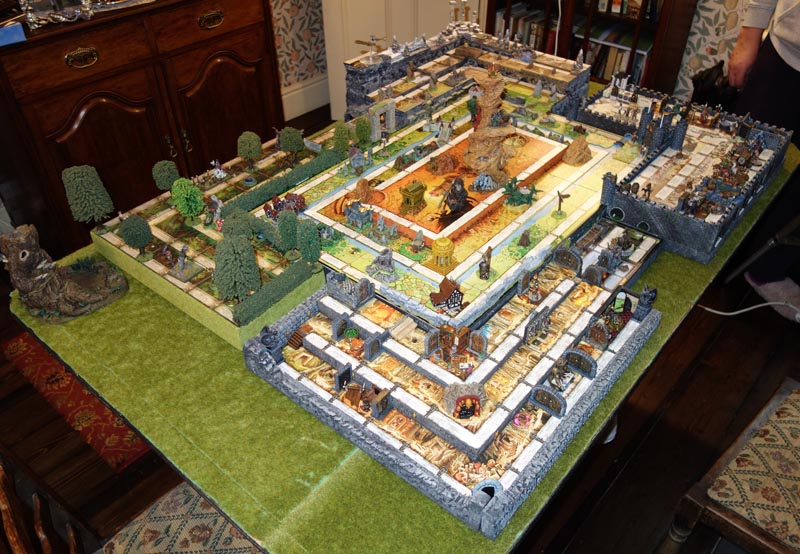
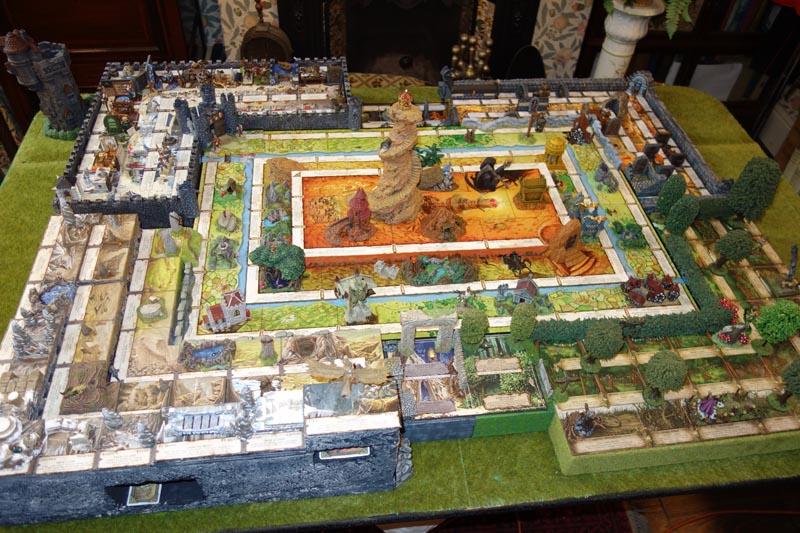
The problem we, as Revised 4th Edition Talisman fans have, is the sheer size of the layout when all the Realms are in place which not only needs a large room, but makes it very difficult to photograph. Here are our attempts at some piccie-wiccies to show the whole thing!
 |
|||
 |
|||
 |
|||
 |
|||
 |
|||
| The Mighty Sentinel looms over the Iron Peaks. Perhaps its why the dwarves abandoned the mines but then who lit that brazier? | |||
 |
|||
| “If you want the Crown you have to come through me!” | |||
 |
|||
| Daybreak and a fetid miasma rises from the Swamp in the Woodlands giving a dreamy view of the distant castle whose pennants flutter gaily in the early morning breeze. |
|||
 |
|||
| But is that mist from the swamp or does it reek of a chaos and deceit? | |||
 |
|||
| When you are right down here it really does feel long way from home. | |||
 |
|||
| Why on earth would anyone with any sense ever go down here? Just look at the place. | |||
 |
|||
| Dice with Death and then a savage snarling Werewolf. Whose idea was it to come this way? |
What is really spooky about the last photo is that when I painted Death’s eye sockets, I only used black paint with no other detail or highlights!!
It has taken 9 months on and off to achieve this end result which does not include all the time taken painting Leavon’s scenery over the years and I must admit I am really happy with the way it has turned out. The added figures and scenery I think give the artwork a boost (other chocolate bars are available) without being too overbearing. I have really enjoyed researching and then tracking down the miniatures needed and my postie must have been sick of bringing small boxes to my letter box every day. I now have a large collection of little figure boxes torn open like broken tombs having disgorged their metal corpses onto my painting table. (I think you’ve been at the sherbet again – Ed)
What I have found as I was working on the different realms was how quickly they developed into the actual locations they are meant to represent. As they rose up, Game of Thrones like, from the boards, the City looks busy with its many shops and personalities, the Woodland quiet and mysterious, the Highlands cold and windswept and the Dungeon evil and foreboding. It’s just the atmosphere I had in mind.
Now to go exploring and experience Great Adventures in Wonderland!